User Manual
Compatible with Revit 2025, 2026, and 2027.
Overview
Auto Finishes is a Revit add-in that automates the batch creation of room finish elements — floors, walls, and ceilings — across any number of rooms simultaneously. Instead of modelling finish layers room by room, select your rooms, choose your finish types, and the tool handles everything in a single operation.
What it does
- ✓Batch creation: Floors, walls, and ceilings for any number of rooms in one click.
- ✓Geometry joining: Finish elements are automatically joined with existing structure, preserving door and window openings.
- ✓Column & edge handling: Finish walls wrap around columns and cap open wall edges.
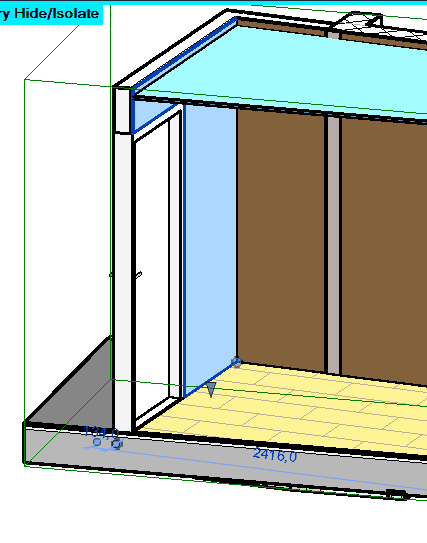
- ✓Skirting boards: Use a thin wall type with a low height setting to create skirting/baseboard elements.
- ✓Override mode: Replace previously created finishes without manual deletion.
- ✓Flexible units: Accepts metric (mm) and imperial (feet/inches) with Revit-native formula input.
- ✓Room filtering: Filter rooms by name and number to locate them instantly.
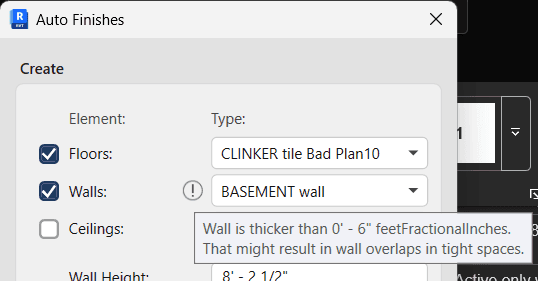
- ✓Thick wall warning: Visual alert when a selected wall type exceeds 15 cm, which can cause geometry overlaps.
Video Demo
Watch the full walkthrough to see Auto Finishes in action:
Installation
Auto Finishes is available on the Autodesk App Store. Once installed:
- 1Open Revit.
- 2Navigate to the Add-Ins tab on the ribbon.
- 3Find the Biminent panel and click the Auto Finishes button.

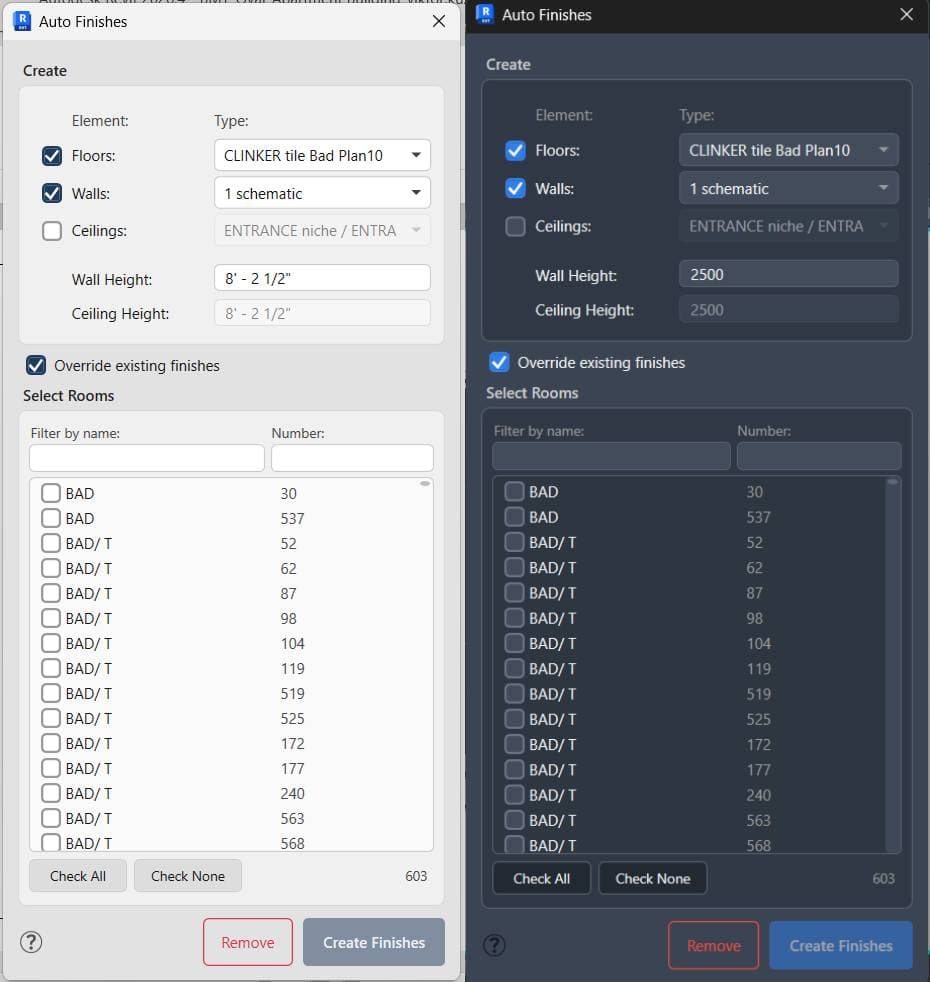
Interface Overview
When launched, the Auto Finishes dialog is divided into two main areas:
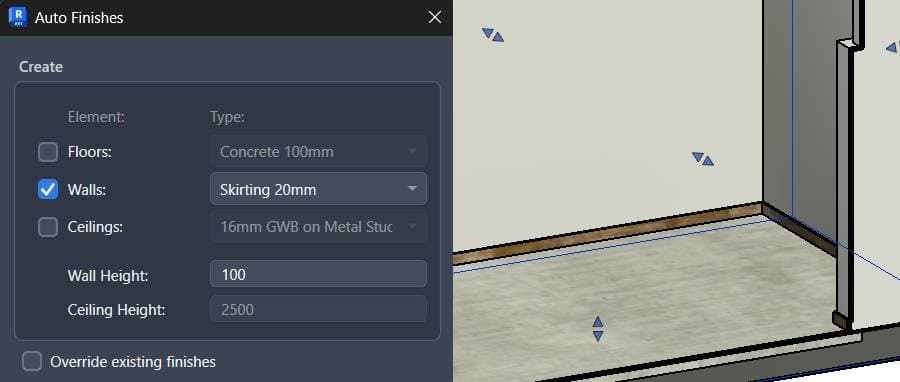
- Create (top section): Configure which finish elements to generate and set their types and heights.
- Select Rooms (bottom section): Browse, filter, and choose which rooms to process.
How to Use
Step 1 — Configure Elements
In the Create section, enable or disable each finish type using its checkbox, and select the element type from its dropdown.
| Setting | Description |
|---|---|
| Floors | Toggle floor finish creation. Select the floor type from the dropdown. |
| Walls | Toggle wall finish creation. Select the wall type from the dropdown. |
| Ceilings | Toggle ceiling finish creation. Select the ceiling type from the dropdown. |
| Wall Height | Sets the unconnected height of finish walls. Default: 2500 mm / 8'-2". Supports Revit formulas (e.g., 3000-500). |
| Ceiling Height | Sets the height of the ceiling above the room's level. Active only when Ceilings is enabled. |
2000+500 and Revit will evaluate it.Step 2 — Check the Thick Wall Warning
If the selected wall type is wider than 15 cm, a warning icon appears next to the wall type dropdown. This indicates a risk of geometry overlap issues at joints between finish wall segments. Consider using a thinner wall type for finish purposes.
Step 3 — Select Rooms
Use the Select Rooms section to choose which rooms to process.
- Filter by Name: Type in the name field to narrow the list to matching rooms (e.g., "Bathroom").
- Filter by Number: Type in the number field to filter by room number or number prefix.
- Individual selection: Check or uncheck individual rooms.
- Check All / Check None: Quickly select or deselect all visible (filtered) rooms.
- Counter: The bottom-right counter (e.g., 5/42) shows selected vs. total rooms.

Step 4 — Override Existing Finishes (Optional)
The Override existing finishes checkbox is enabled by default. When active, the tool automatically deletes any finishes previously created by Auto Finishes in the selected rooms before generating new ones. This prevents duplication without requiring manual cleanup.
Uncheck this option if you want to add finishes on top of existing ones without removing them.
Step 5 — Create Finishes
Click the Create Finishes button. A progress window will display the current operation:
- Analyzing rooms
- Placing floors and ceilings
- Placing walls
- Joining elements
- Finalizing
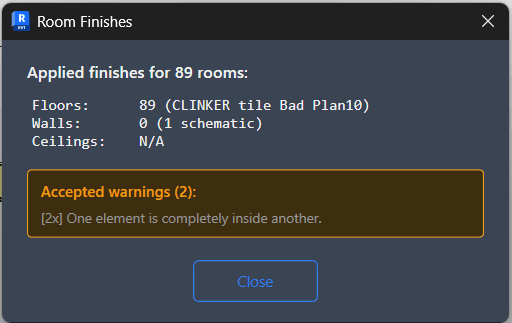
Step 6 — Review Results
Once complete, a Results window shows:
- Count of created floors, walls, and ceilings
- Element types that were used
- Any warnings encountered during creation
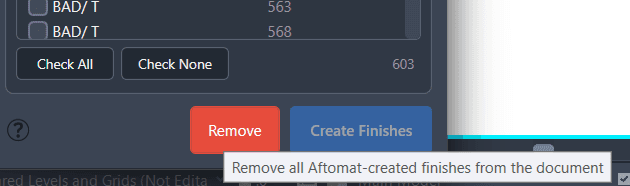
Removing Finishes
To delete all finishes previously created by Auto Finishes across the entire document, click the Remove button at the bottom of the dialog.
Behavior & Limitations
Understanding what Auto Finishes will and will not process helps avoid unexpected results.
What finishes are placed against
- Standard (basic) walls
- Columns
What is ignored
- Curtain walls — no finish wall is created along curtain wall faces.
- Room separator lines — no finish wall is placed along these boundaries.
Geometry joining
All created finish elements are automatically joined with adjacent geometry. This ensures that door and window openings cut through finish walls correctly, and that finish floors integrate with the existing floor slab.

Tips & Best Practices
- →Skirting boards: Select a very thin wall type and set the Wall Height to a low value (e.g., 100 mm) to create skirting or baseboard elements.
- →Formula input: Height fields support Revit formulas. Enter expressions like 3000-500 directly.
- →Imperial units: If your project uses feet and inches, the height fields will automatically reflect that — no conversion needed.
- →Override mode scope: Overriding only affects the currently selected rooms. Finishes in other rooms remain untouched.
- →Thick walls: If you see the thick wall warning, try a thinner wall type to avoid overlap artifacts at corners and joints.
- →Partial application: You can run the tool multiple times with different settings for different room groups. Use the filter to target specific rooms each time.
Help & Support
- In-app help: Click the info icon (bottom-left of the dialog) to open the Support window, which shows version information and contact details.
- Updates: Check for updates via the Support window.
- Contact: support@biminent.com
Log Files
If you encounter issues, log files are saved here:
%APPDATA%\Biminent\AutoFinishes\logs\autofinishes_YYYY-MM-DD.logLogs are retained for 7 days. Include the relevant log file when reporting issues.
Still need help? Contact us.