
1Overview#
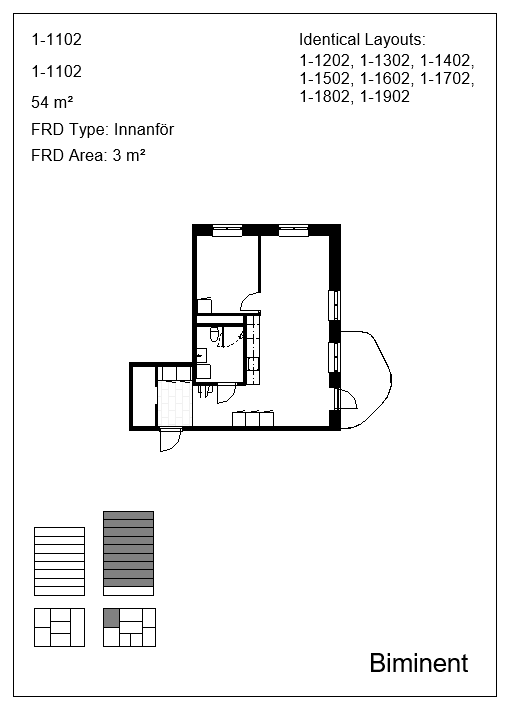
Apartment Sheets turns the Areas in your Revit model into a finished set of apartment plan sheets. For every area you select it creates a plan view, crops that view tightly to the apartment, places the view on a new sheet with your title block, and fills in the title block from the model — area, apartment type, storage data, and the small key figures that show where the apartment sits in the building.
The work it replaces is the slow part of producing an apartment documentation set: duplicating views, dragging crop boundaries to the right wall face, rotating views so the plan reads the same way on every sheet, and typing the same handful of values into every title block. On a project of any size that is days of work, and it has to be redone every time the layouts move.
1.1What the tool produces#
- One plan view per apartment, cropped to the apartment boundary with configurable offsets from the surrounding walls.
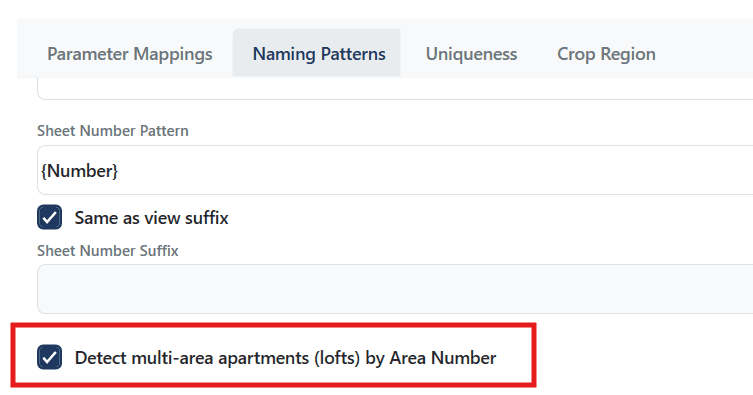
- One sheet per apartment, carrying your chosen title block, numbered and named from patterns you control. If there are 2 or more Areas with the same number there is a toggle to determine whether to include them all on the same sheet – suitable for loft apartments.
- Title block parameters filled from the model — apartment area, apartment type, storage (förråd) area and location, and the numbers of identical apartments elsewhere in the project. These are configurable to use with your parameters. A toolset for setting visibility parameters on the title block is provided as well.
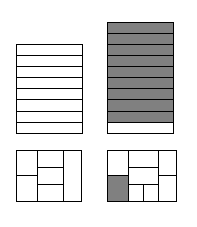
- Plan and section key figures on the title block with the correct apartment highlighted, driven by visibility parameters in the family.
- Views rotated so the apartment reads consistently, whether the building sits square to the project axes or at an angle.
- Sheets grouped in the project browser according to browser organisation parameters you set at run time.
1.2Who it is for#
The tool was built for Swedish residential production documentation and its defaults follow that market — Swedish apartment numbering, förråd handling, and "Innanför / Utanför" storage labels. Nothing in it is locked to Sweden: the numbering pattern, the keyword lists and every parameter mapping are configurable, so the same workflow applies to any project where apartments are modelled as Areas.
1.3How the tool thinks about an apartment#
Everything starts from Revit Areas. One area is one apartment, and the area's Number is the apartment's identity: it drives the view name, the sheet number, the title block indicator parameters and the matching of storage rooms to apartments. If the numbering is inconsistent the tool still runs, but the parts that read structure out of the number — building, floor, unit — will not resolve.
Two apartments are "the same type" when their geometry matches, or when they sit in instances of the same model group. That relationship is what lets the tool produce one sheet per layout instead of one per unit, and it is described in full in chapter 8. Note: the tool works fine with areas inside or outside groups.
Apartments spanning two areas.
A loft or maisonette modelled as two areas that share one Number is treated as a single apartment and lands on a single sheet, provided Detect multi-area apartments is on in the settings.
2Requirements and installation#
2.1System requirements#
| Item | Requirement |
|---|---|
| Revit | Autodesk Revit 2025, 2026 or 2027 |
| Operating system | Windows 10 or Windows 11, 64-bit |
| Rights to install | Local administrator rights — the installer writes to Program Files |
| Sign-in | An Autodesk account registered with Biminent for your organisation |
| Network | Internet access at sign-in and for the daily update check; the tool works offline afterwards for a limited grace period |
2.2Installing#
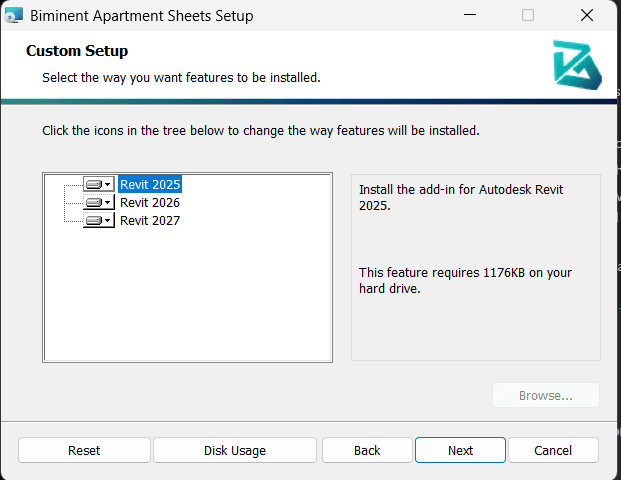
Apartment Sheets ships as a single signed MSI that covers every supported Revit version. You do not need a separate download per year.
- Close Revit. The installer cannot replace files that Revit has loaded.
- Run
Biminent-ApartmentSheets-<version>.msiand accept the licence agreement. - On the feature page, choose the Revit versions to install for. Versions already present on the machine are detected and pre-selected; the others stay listed and can be selected anyway if you are deploying ahead of a Revit rollout.
- Finish the installation and start Revit. The Biminent tab appears on the ribbon.
Where the files go#
Program files are installed per machine, under an administrator-protected location:
C:\Program Files\Biminent\ApartmentSheets\<Revit year>\The Revit add-in manifest goes wherever that Revit version looks for all-users add-ins:
| Revit version | Add-in manifest location |
|---|---|
| 2025, 2026 | C:\ProgramData\Autodesk\Revit\Addins\<year>\ |
| 2027 and later | C:\Program Files\Autodesk\Revit\Addins\<year>\ |
2.3Deploying across an office#
The MSI is built for unattended deployment and works through Intune, SCCM or Group Policy. Install every supported version, or name the ones you want:
msiexec /i Biminent-ApartmentSheets-<version>.msi /qn ADDLOCAL=ALL
msiexec /i Biminent-ApartmentSheets-<version>.msi /qn ADDLOCAL=Revit2025,Revit20272.4Updating#
The tool checks once a day for a newer version and, when one is available, shows a small non-modal card inside Revit rather than interrupting your work. You can also check on demand from the account window. Updates are installed by running the new MSI — it replaces the previous version in place, and your settings and presets are preserved.
Suppressing the update check#
Where updates are deployed centrally, IT can switch the automatic check off so users are never nudged to install an MSI themselves. Either of these disables it:
| Switch | Where |
|---|---|
| DisableUpdateCheck (DWORD) = 1 | HKEY_LOCAL_MACHINE\SOFTWARE\Biminent — machine-wide, the usual choice. Also honoured under HKEY_CURRENT_USER. |
| BIMINENT_DISABLE_UPDATE_CHECK = 1 | Environment variable, for per-machine or per-user deployment scripts. |
Setting the machine-wide policy:
reg add "HKLM\SOFTWARE\Biminent" /v DisableUpdateCheck /t REG_DWORD /d 1 /fRun this from a 64-bit command prompt. A 32-bit script is redirected to HKLM\SOFTWARE\WOW6432Node\Biminent, where the tool does not look.
Two things to be aware of:
- The manual check still works. These switches stop the daily background check and the nudge card. Check for updates in the account window is a deliberate user action and still contacts the server.
- A new environment variable needs a fresh Revit. Revit reads its environment when it starts, so set the variable before launching Revit — changing it while Revit is running has no effect on that session.
2.5Uninstalling#
Uninstall from Windows Settings → Apps, or silently:
msiexec /x Biminent-ApartmentSheets-<version>.msi /qnUninstalling removes the program files and the add-in manifests. Your saved configuration presets and the log files stay on the machine, so reinstalling restores your setup.
3Sign-in and licensing#
Access is tied to your organisation's Autodesk account. On first use you sign in once; after that the tool starts silently and keeps working, including offline, for as long as your entitlement is valid.
3.1Signing in#
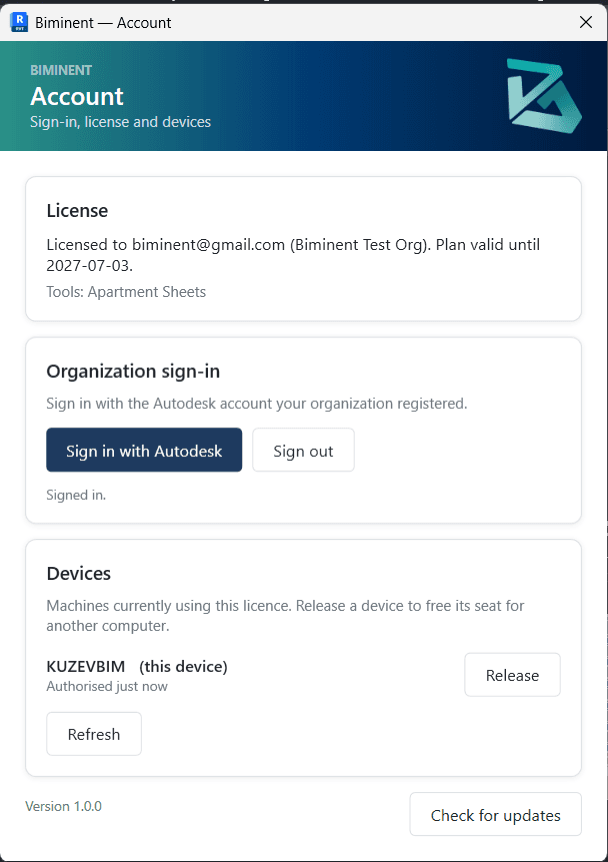
- Open the Biminent account window from the ribbon.
- Choose Sign in with Autodesk and complete the sign-in in the browser window that opens.
- Return to Revit. The License section shows your entitlement and Devices lists the machines you are signed in on.
3.2Devices and seats#
Your licence covers a set number of machines. Each machine you sign in on takes a seat, and the Devices list shows them with the date each was last authorised. To move your licence to another machine, select the device you no longer use, choose Release, then sign in on the new one.
3.3Working offline#
The tool does not need a connection to run. It refreshes its licence quietly in the background when it can, and if no connection is available it continues to work for a grace period before asking you to sign in again.
If the tool cannot refresh your licence while you are online — most often because it has been signed out, rather than because the network is down — it shows a persistent card in Revit asking you to sign in. The card stays until you act on it. You can sign in or close it, but until singing in you run on offline grace period. The length of the period is as per agreed with each company.
4The ribbon#
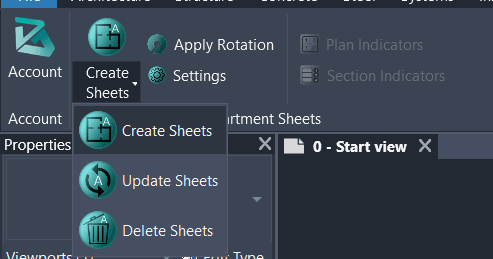
All commands live on the Biminent tab, in the Apartment Sheets panel. Buttons are enabled only where they make sense: the sheet commands need a project document, and the two indicator helpers only work inside the Family Editor.
| Button | What it does | Available in |
|---|---|---|
| Create Sheets | Opens the main window: pick areas, create views and sheets. Chapter 6. | Project |
| Update Sheets | Re-reads the model and refreshes existing apartment sheets — crop regions, mapped parameters, indicators — and offers to remove sheets whose area was deleted. Chapter 7. | Project |
| Delete Sheets | Batch-deletes apartment views and their sheets. Chapter 7. | Project |
| Apply Rotation | Applies manual rotation nudges entered on sheets. Section 6.8. | Project |
| Settings | Opens the configuration window. Chapter 9. | Anywhere |
| Plan Indicators | Creates plan key-figure visibility parameters in a title block family. Chapter 11. | Family Editor |
| Section Indicators | Creates section key-figure visibility parameters in a title block family. Chapter 11. | Family Editor |
4.1The right-click shortcut#
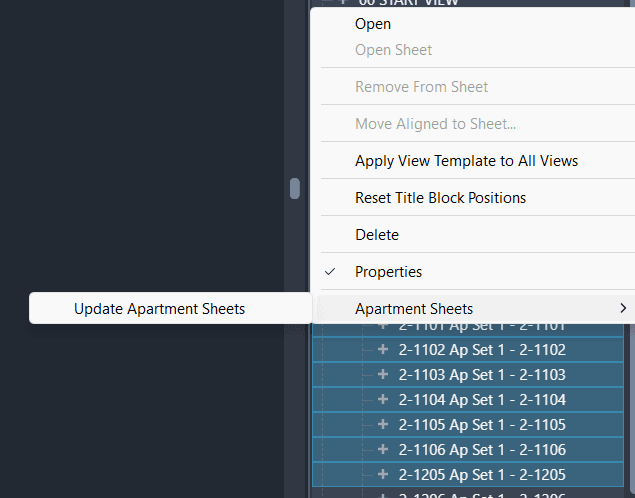
Selecting one or more apartment sheets in the project browser and right-clicking gives you Update Apartment Sheets, which refreshes just those sheets. It is the quickest way to pick up a change to a single apartment without opening the full update dialog.
5Preparing the model#
The tool reads an existing model rather than building one, so a little preparation decides how much of the output is finished and how much needs touching up. Work through this chapter once per project — or once per office template, after which new projects need nothing.
5.1Areas#
- Model one Area per apartment, in an area plan. Areas, not rooms — rooms are used for storage and balconies, but the apartment itself must be an area.
- Give every area a Number and a Name. The Number is the apartment identity; the Name is where the apartment type comes from.
- For a loft or maisonette spanning two levels, give both areas the same Number — they will be combined onto one sheet.
5.2Apartment numbering#
The tool reads structure out of the apartment number so it can resolve which building, floor and unit an apartment belongs to. The default pattern is the Swedish convention Building-FloorSequence:
| Number | Building | Floor code | Unit |
|---|---|---|---|
| A-0301 | A | 03 | 01 |
| B0502 | B | 05 | 02 |
| 1-0103 | 1 | 01 | 03 |
Floor codes in Swedish numbering are offset by 10, so code 10 is the ground floor and 21 is floor 11. The tool does not decode this — it uses the code exactly as written, which is why title block parameters are named after the codes themselves. The parsing pattern is configurable — see section 9.3.
5.3View template#
Create a view template for apartment plans and set it up completely — scale, detail level, visibility, annotation categories, colour fill. Every created view gets this template, so anything the template controls is right from the start and stays consistent across the whole set.
5.4Title block family#
The title block is where most of the automation lands. It needs shared parameters for the values the tool writes, and — if you want the key figures — visibility parameters for the plan and section indicators. Chapter 11 covers building this family in full. At minimum you need shared parameters for whichever values you intend to map: apartment area, apartment type, storage area and storage location.
5.5Scope boxes (optional)#
If you rotate views by scope box rather than automatically, create one scope box per building aligned to that building's facade, and name them consistently. Names such as HUS A, HUS B, BUILDING 1 are recognised and offered automatically. If you use automatic rotation instead, no scope boxes are needed.
5.6Storage rooms and balconies (optional)#
Storage — förråd — is matched to apartments in two ways, and which one applies decides what Storage Type reports:
- Inside — the storage room sits on the apartment's own level and its position falls within the apartment boundary. A store within the flat itself.
- Outside — the storage room's Number equals the apartment's Number. This rule ignores levels, because a separate store is usually in a basement.
Name the storage rooms so they match the storage name pattern (FRD by default), and give a storage room outside the apartment the same Number as the apartment it belongs to. The tool then reports the total area of everything matched, and whether any of it sits inside.
Balconies can be modelled either as floor slabs or as rooms. Whichever you use, name the types or rooms so they match the balcony keyword list, and tell the tool which of the two conventions your project follows in the settings.
6Creating sheets#
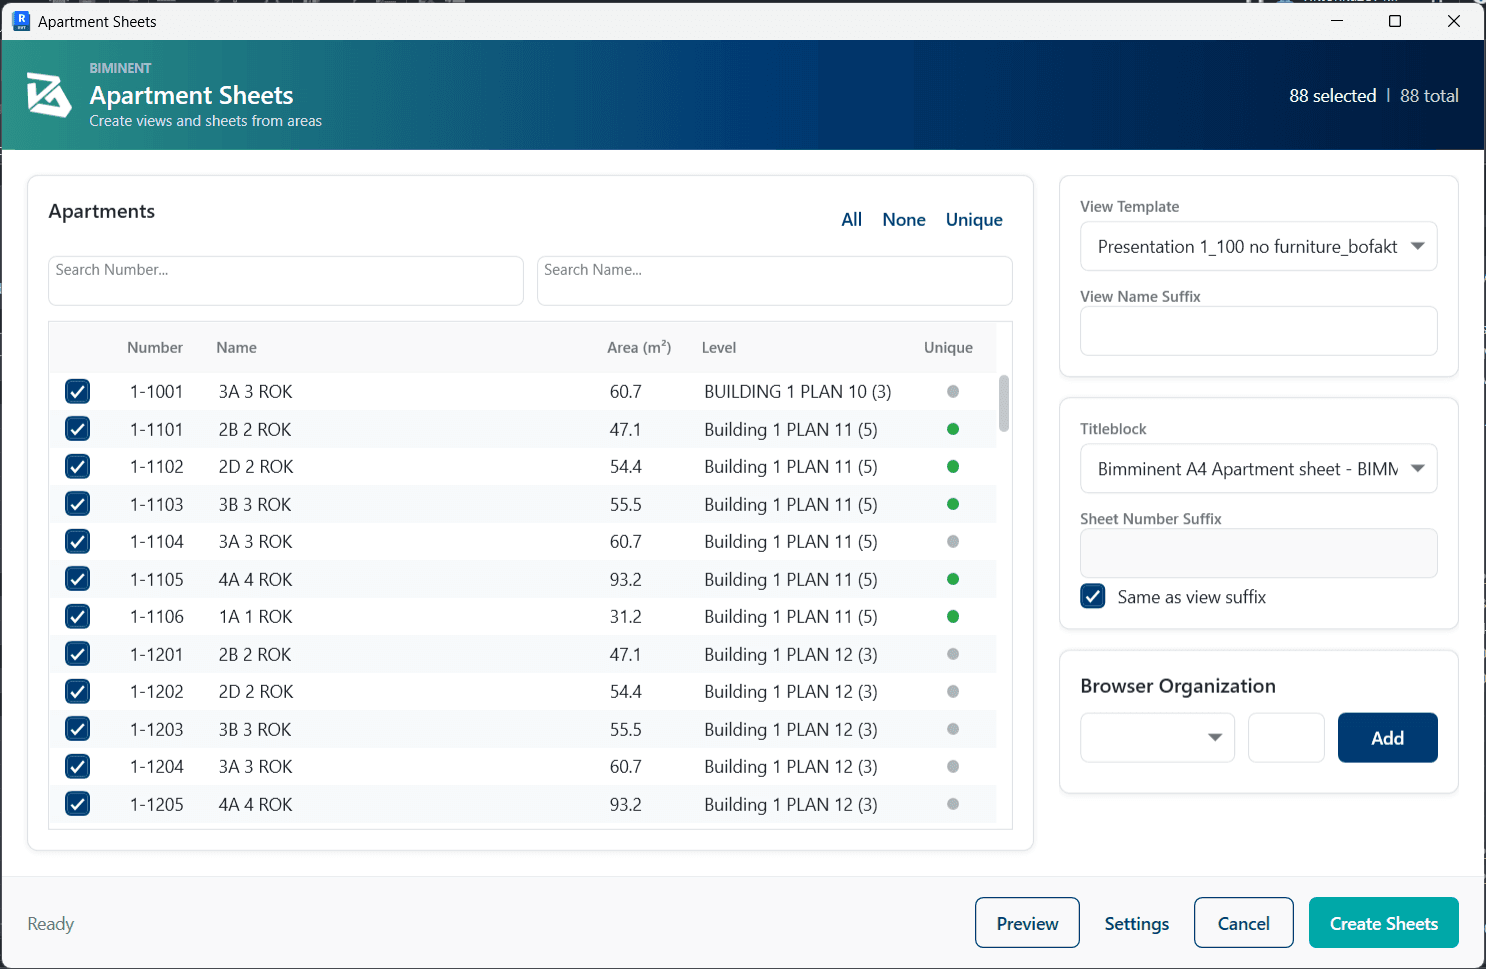
This is the main workflow. The window is in two halves: the apartments to work on, on the left, and how to build their sheets, on the right.
6.1Choosing apartments#
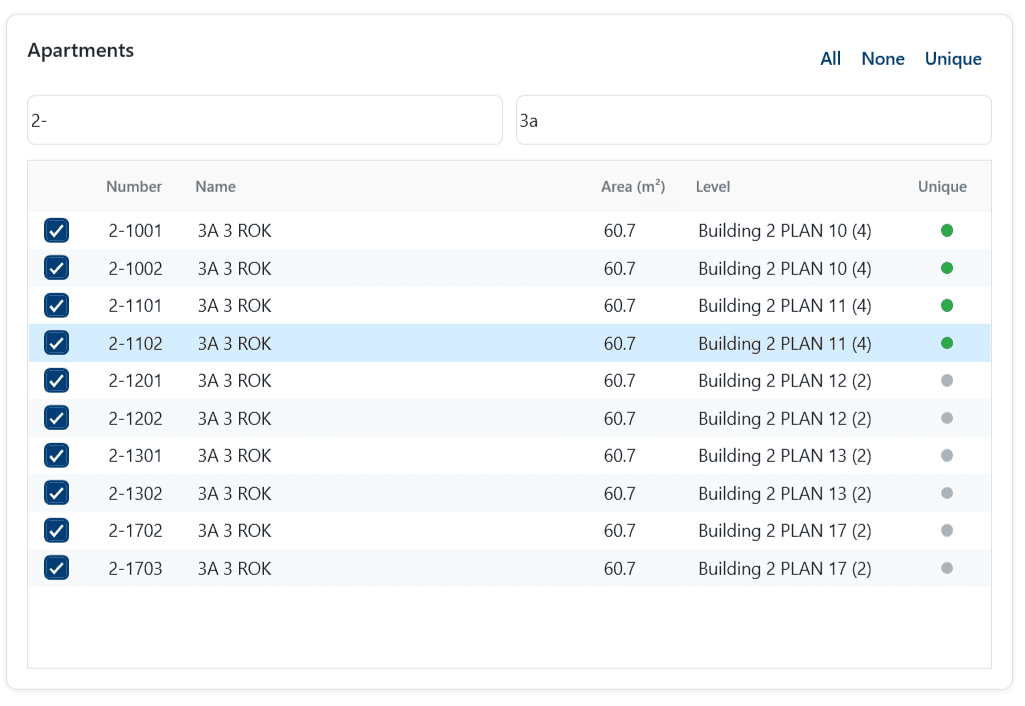
The left panel lists every numbered area in the project with its number, name, area in project units and level. The dot in the last column marks apartments that are a unique type.
- Search Number and Search Name filter the list as you type. They combine, so you can narrow to one building and one apartment type at once.
- All and None select and clear every apartment in the project, not only the rows the filters are currently showing. Filter first and then tick rows, or select a block and press
Space, when you want just the visible subset. - Unique selects one apartment per type — the fastest way to produce a type-based set rather than a sheet per unit. If no apartment carries a uniqueness value yet, it offers to run the analysis for you first.
- Unique selects one apartment per type — the fastest way to produce a type-based set rather than a sheet per unit.
- You can also tick apartments individually, or select a block of rows and press
Spaceto toggle them together.
6.2View template and view names#
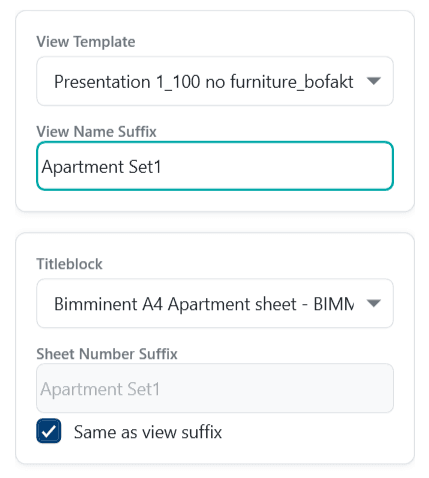
- View Template — the template applied to every created view. The tool pre-selects whatever you used last on this project; on a project it has not seen before it falls back to a template whose name looks like an apartment template.
- View Name Suffix — appended to every view name. Use it to separate one production round from another, or to keep a revision apart from the original.
View names themselves come from a pattern, which is the apartment number by default. Section 9.3 covers changing it.
6.3Title block and sheet numbers#
- Titleblock — the family type placed on every new sheet.
- Sheet Number Suffix — appended to every sheet number.
- Same as view suffix — on by default, and keeps the sheet suffix locked to the view suffix so the two never drift apart. Untick it to set them separately.
6.4Browser organisation#
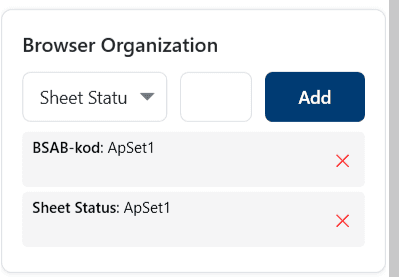
Sheets created in bulk are only useful if they land in the right place in the project browser. This panel writes the sheet parameters your browser organisation is built on, at creation time, so you do not have to go back and set them afterwards.
- Pick a parameter from the dropdown.
- Type the value it should get.
- Choose Add. The pair appears in the list below.
- Repeat for as many parameters as your browser organisation uses. Remove an entry with the ✕ next to it.
6.5View rotation#
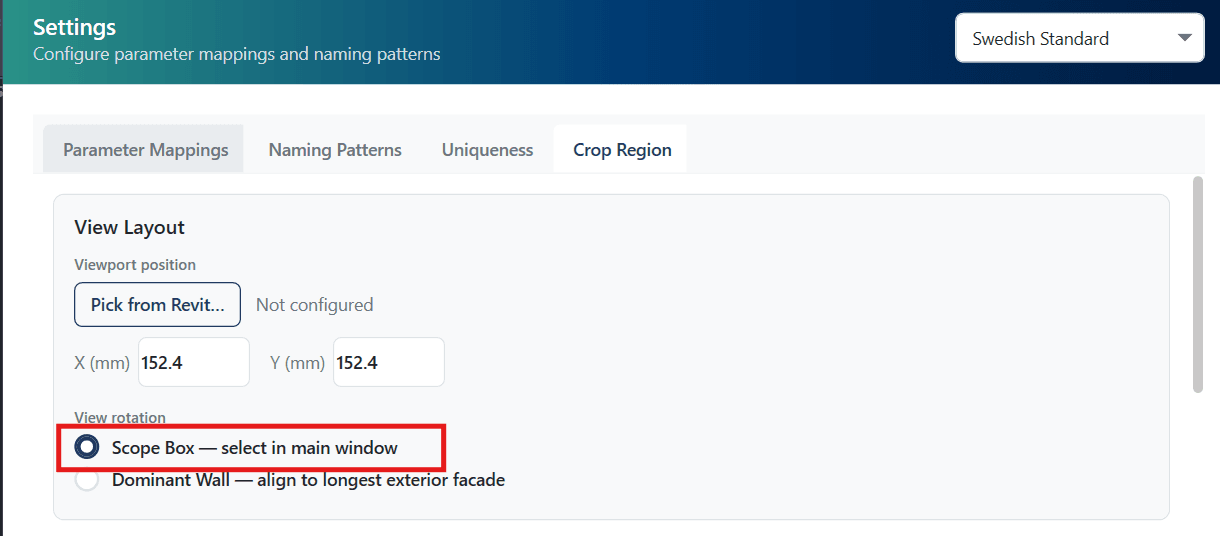
Apartments should read the same way on every sheet even when the buildings they sit in do not align with the project axes. The tool offers two ways to achieve that, chosen in the settings:
- Dominant Wall — the view is aligned to the prevailing direction of the apartment's exterior walls, weighted by length, and you choose whether the apartment's longest dimension should run across the sheet or up it. The result is then flipped where needed so the plan never reads upside down. An apartment with no exterior wall falls back to its overall shape. This is automatic and needs no model preparation.
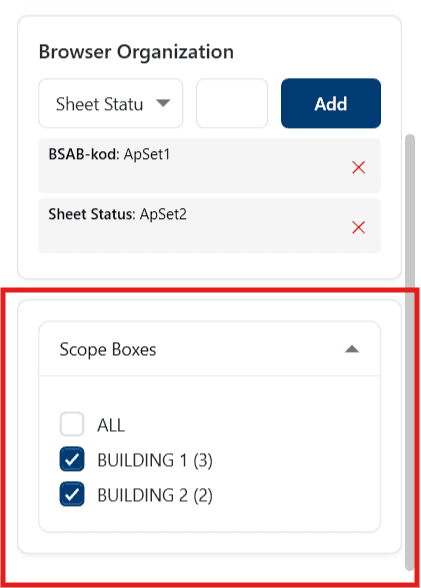
- Scope Box — the view is aligned to a scope box, which you select in the Scope Boxes panel of the main window. This panel only appears when scope box rotation is the chosen method. Use it when you want every apartment in a building aligned identically regardless of its own walls.
6.6Previewing before you commit#
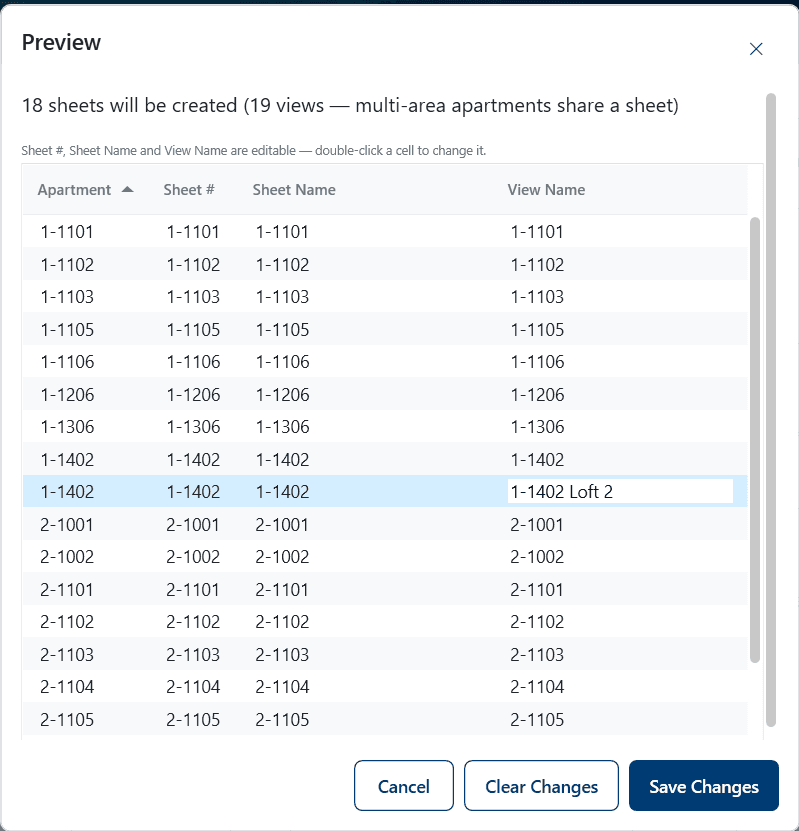
Choose Preview to see exactly what will be created before anything is written to the model. The preview lists every sheet with its proposed sheet number, sheet name and view name, and flags a name or sheet number that is already in use, together with anything odd found while reading the model — several storage rooms matching one apartment, for instance.
The three name columns are editable. Double-click a cell to change it, then Save Changes to keep your edits or Clear Changes to go back to the generated names. This is the moment to fix a clash, rather than renaming sheets afterwards.
6.7Creating#
Choose Create Sheets to run. If any of the proposed names or sheet numbers already exist, a dialog says so first and lets you go ahead or stop; going ahead does not overwrite anything, it appends _Copy until the name is free.
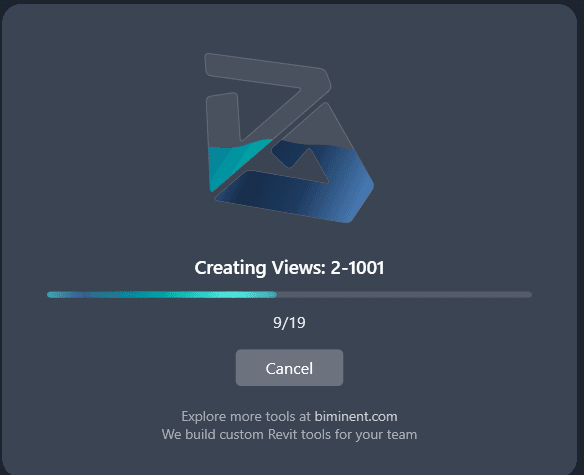
A progress bar reports each stage — creating views, calculating crop regions, setting scope boxes, applying crop regions, then creating the sheets — and Cancel stops the run at any point, so a wrong selection costs you seconds rather than the whole batch.
When the run finishes, the new sheets are collected together in the project browser according to the browser organisation parameters you set.
6.8Manual rotation nudges#
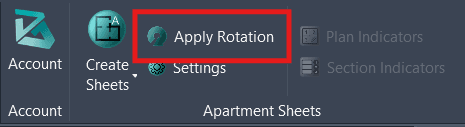
Occasionally one apartment wants a different rotation from what the automatic alignment produced. Rather than editing the crop box by hand, type an angle into the BMT_View_Rotation parameter on the sheet, then run Apply Rotation from the ribbon. Every sheet with a non-zero value has its view rotated by that angle about the centre of its crop box, and the parameter is reset to zero.

7Updating and deleting sheets#
Layouts move. Apartments are renumbered, walls shift, an area is deleted. These two commands keep an existing sheet set in step with the model without recreating it.
7.1Update Sheets#
Update re-reads the model and works out what has changed on the sheets that already exist — crop regions that no longer match the walls, mapped parameters whose source value has changed, indicators pointing at the wrong apartment — and lists it for review before touching anything.
- Only rows that actually change something are ticked when the dialog opens, so the default action is the minimal one.
- Check all and Uncheck all toggle everything; selecting a block of rows and toggling any checkbox applies to the whole selection.
- The Changes column says what will happen to each sheet, and Notes explains anything unusual.
- Sheets whose source area has been deleted are listed as orphaned. Applying the change deletes both the view and the sheet.
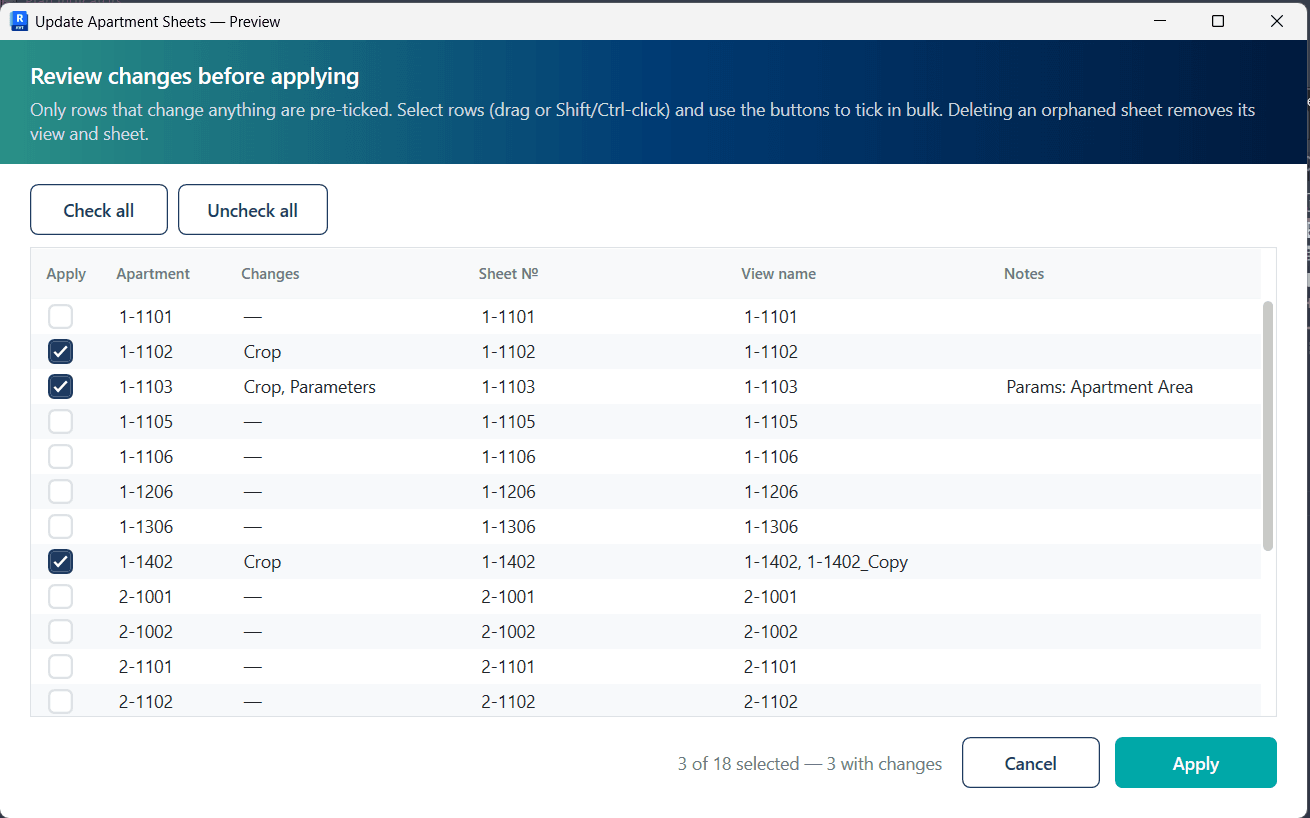
Choose Apply to carry out the ticked changes. To update only a few sheets, select them in the project browser and use the Update Apartment Sheets right-click command instead.
7.2Delete Sheets#
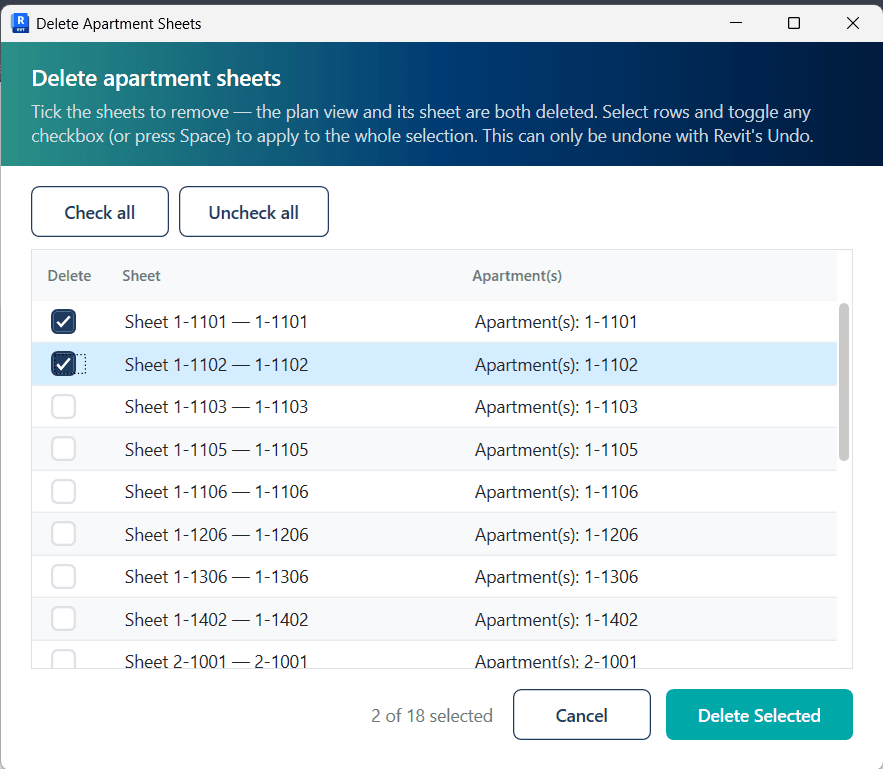
Delete removes apartment views and their sheets together, in bulk. The dialog lists the apartment sheets in the project with the apartments each one covers; tick the ones to remove and confirm.
8Unique apartment types#
Most residential projects repeat a small number of layouts many times over. Producing one sheet per layout instead of one per apartment cuts the set down enormously — but only if the tool can tell reliably which apartments are genuinely the same. That is what uniqueness analysis does.
8.1How identical apartments are recognised#
Two methods are available, chosen in the settings:
| Method | How it works | When to use it |
|---|---|---|
| Geometry | Compares the shape of the area boundaries, allowing for position and rotation. Works on any project with no preparation. | Default. Best when apartments are modelled individually. |
| Group Type | Areas inside instances of the same model group are identical by definition. Areas not in a group fall back to geometry comparison. | Best when apartments are modelled as groups — immune to small modelling deviations that would split a geometry match. |
On top of whichever method you choose, two things always force a separate type:
- Mirrored apartments get their own type, suffixed
-M. A mirrored plan is not the same plan. - Apartments with a balcony get their own type, suffixed
-B, when balcony proximity is enabled.
8.2Balcony detection#
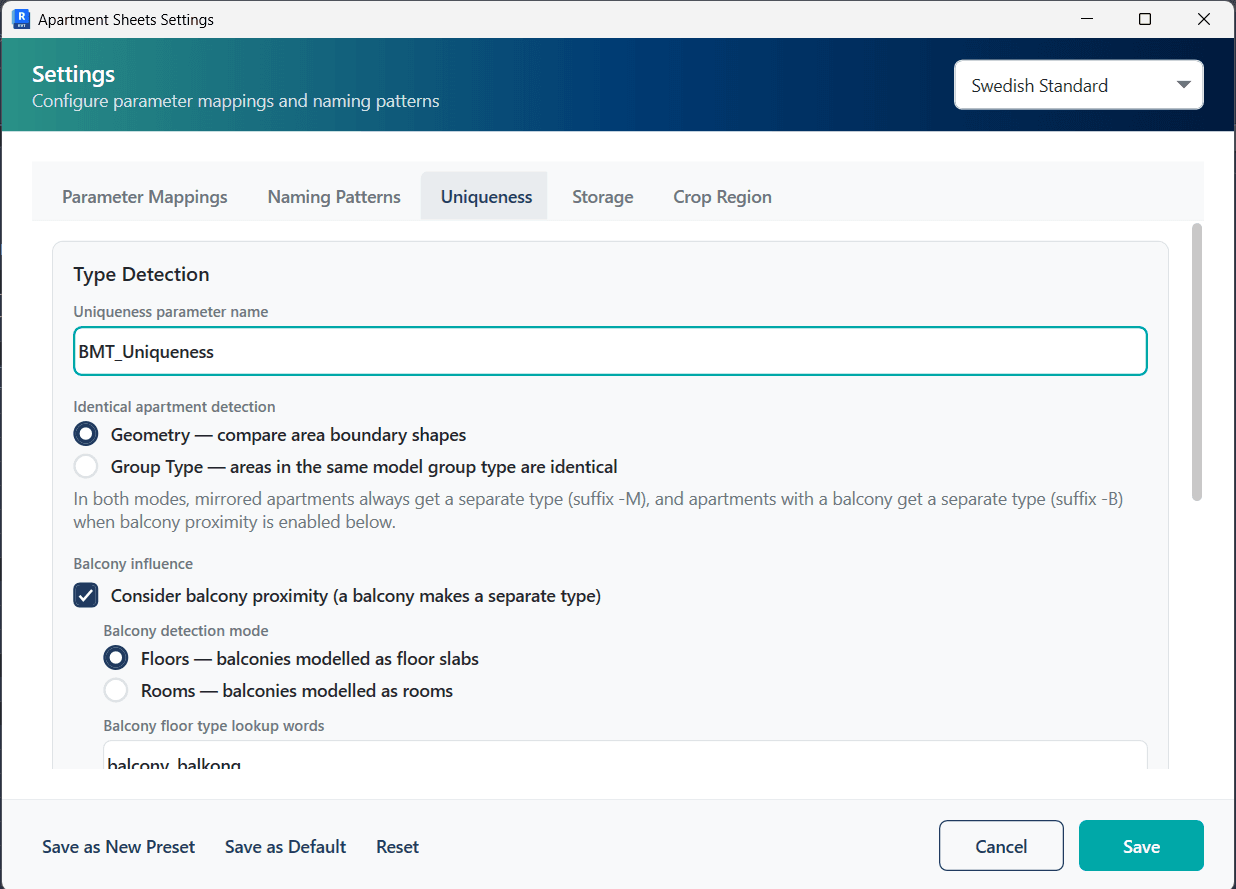
Balconies are modelled differently from office to office, so the tool supports both common conventions. Choose the one your project uses and give it the keywords to look for:
- Floors — balconies are floor slabs, matched by floor type name. Default keywords:
balcony, balkong. - Rooms — balconies are rooms, matched by room name. Default keywords:
balkong, altan, terrass, balcony, terrace.
Matching is case-insensitive and looks for the keyword anywhere in the name, so one keyword usually covers a family of type names. A balcony counts as belonging to an apartment when it sits close enough to the area boundary — measured from the balcony edge, not its centre, so a long balcony is not missed.
8.3Running the analysis#
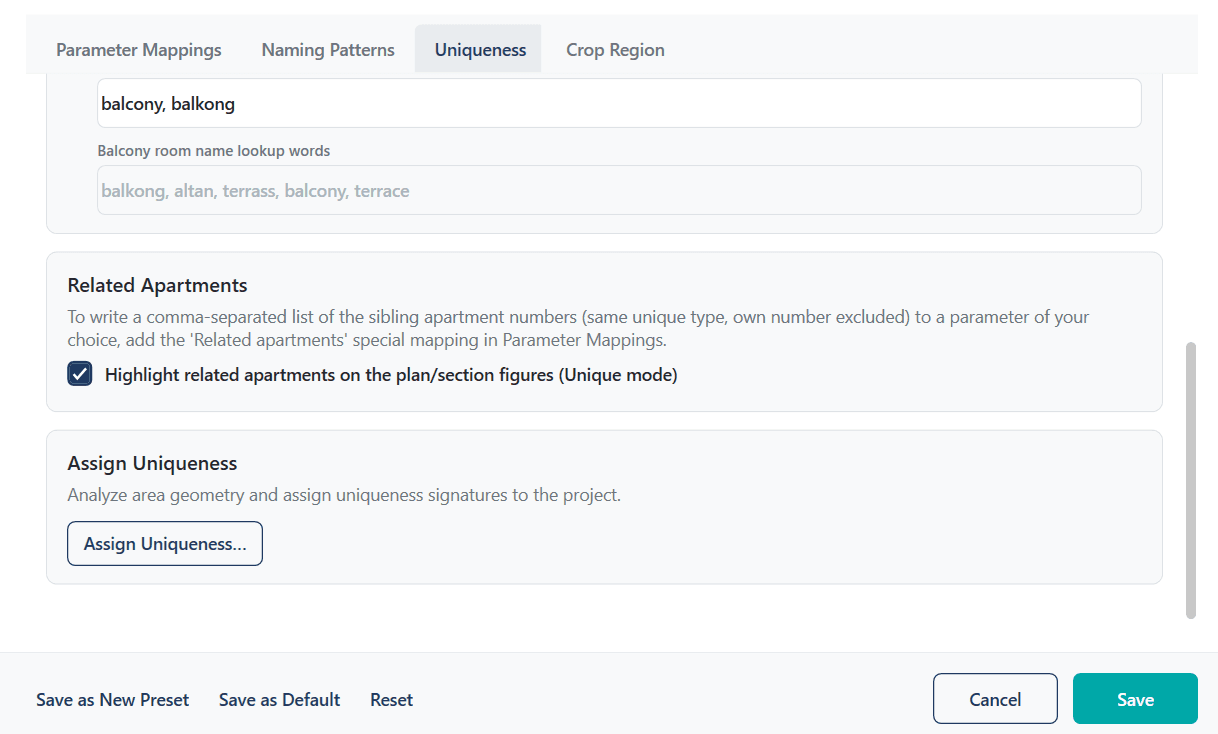
Open Settings → Uniqueness and choose Assign Uniqueness…. The dialog summarises the method and balcony settings in force, so you can confirm them before running. Choose Assign and the tool analyses every numbered area and writes a type signature to the uniqueness parameter on each one — BMT_Uniqueness by default.
Once assigned, the dots in the main window's Unique column become meaningful and the Unique button selects one apartment per type. Re-run the analysis whenever layouts change materially.
If any apartment already carries a uniqueness value, a second dialog asks what to do with it: Override All re-analyses everything and rewrites every value, and Fill Unassigned Only leaves existing values alone and fills the gaps. Re-run the analysis whenever layouts change materially, and choose Override All when they have.
8.4Related apartments#
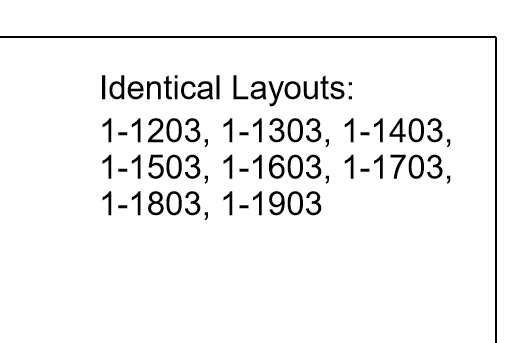
On a unique run, each sheet can carry the numbers of the other apartments that share its layout — so a reader of the type sheet knows which units it applies to. Add the Related Apartments special mapping in the settings and point it at the parameter that should hold the list. The list is comma-separated and excludes the sheet's own apartment.
Separately, Highlight related apartments on the plan/section figures extends the key figures so they mark every apartment of that type rather than only one. On normal runs the figures always highlight just the sheet's own apartment.
9Settings reference#
The settings window is reached from the ribbon or from the Settings button in the main window, and is organised into five tabs. Settings are stored per project, over company-wide defaults, so a project can deviate without disturbing the office standard.
9.1Presets#
The dropdown in the window header switches between saved presets. At the bottom of the window:
- Save as New Preset — stores the current settings under a name of your choice, for reuse on other projects.
- Open Config Folder — shows the saved presets and the per-project settings on disk, which is the quickest way to copy a preset to another machine or to inspect a value that has no field.
- Save as Default — makes the current settings the company default for new projects.
- Reset — returns to the shipped defaults.
- Save applies your changes to this project; Cancel discards them.
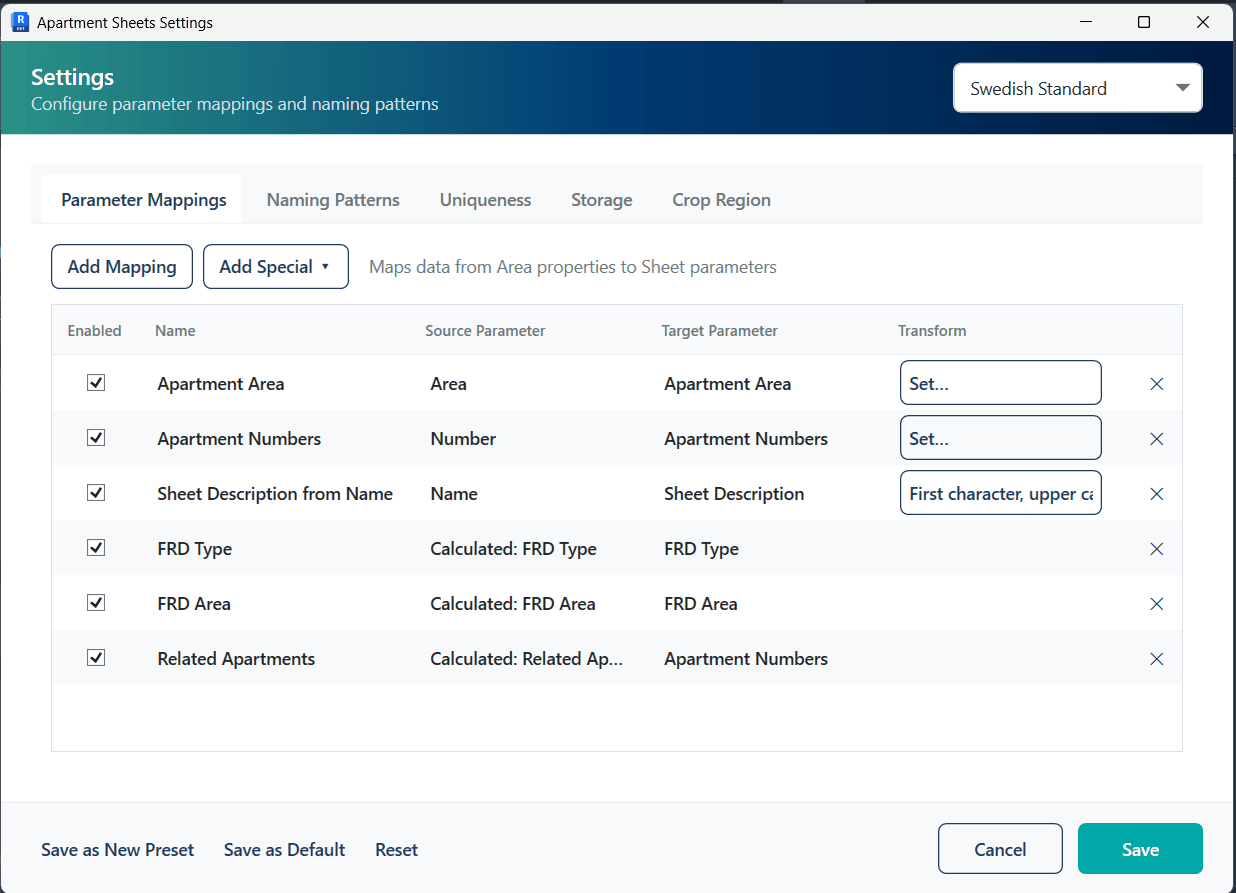
9.2Parameter Mappings tab#
Mappings are the rules that move data out of the model and onto the sheets. Each row is one rule, and each can be switched off without deleting it.
| Column | Meaning |
|---|---|
| Enabled | Whether the rule runs. |
| Name | Your label for the rule. Has no effect on the output. |
| Source Parameter | Where the value comes from — an area property, or a calculated or static value. |
| Target Parameter | The sheet or title block parameter the value is written to. The last column of each row carries a ✕ that deletes the rule outright. To keep a rule but stop it running, untick Enabled instead. |
| Transform | Opens the transform editor for the rule, and shows a summary of the transform once one is set. Empty for calculated and static mappings. |
Adding mappings#
Add Mapping creates a direct copy from an area property to a sheet parameter. Add Special ▾ offers the calculated and fixed values:
| Special mapping | What it writes |
|---|---|
| Storage Area | Total storage (förråd) area matched to the apartment. |
| Storage Type | Whether the storage is inside or outside the apartment — "Innanför" or "Utanför" by default. Both words are editable on the Storage tab. |
| Related Apartments | Comma-separated numbers of the other apartments sharing this layout, excluding its own. Written on unique runs only. |
| Static Value | A fixed text you type, written to every sheet. Useful for a project code or a document status. |

Transforming values on the way through#
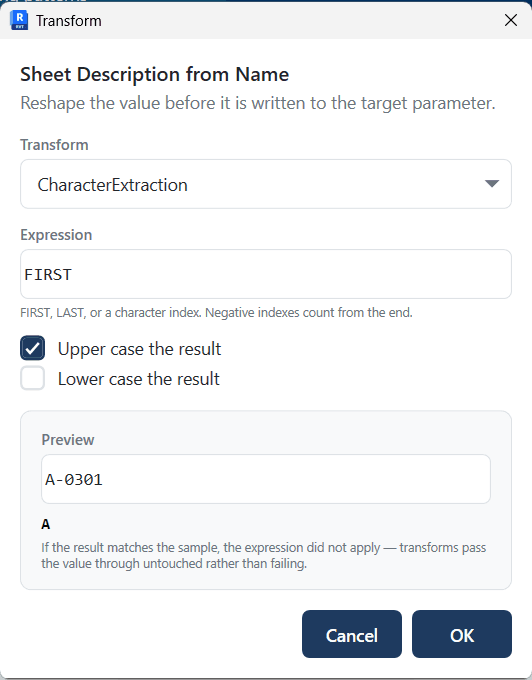
A mapping can reshape a value rather than copying it verbatim. This is how the default apartment-type mapping turns an area name into a single type letter — it takes the first character and upper-cases it.
Every mapping that can carry a transform has a Transform cell in the grid. It reads Set… when none is set, and a summary when one is — First character, Regex: \d+, Replace: "-" → "_" — so a transform is visible in the list rather than buried in the configuration file. Calculated and static mappings cannot carry one, and their cell stays empty.
Choosing that button opens the Transform window. Pick a type, type the expression, and the hint under the box changes to say what the expression means for the type you chose. Preview applies the real transform to a sample value as you type — the sample is seeded from your project's example apartment numbers, and you can type over it.
| Transform | Expression | Example |
|---|---|---|
| Character extraction | FIRST, LAST, or a character index | FIRST of "A Standard" gives "A" |
| Regular expression | The pattern to match; the match is kept | \d+ of "Hus 12" gives "12" |
| Substring | start or start,length | 0,3 of "ABCDEF" gives "ABC" |
| Replace | find|replace — literal text, not a pattern | -|_ turns "A-0301" into "A_0301" |
The result can additionally be forced to upper or lower case. Negative character indexes count from the end of the value.
Most transforms fail soft. If an expression cannot be applied — an invalid regular expression, a substring start past the end of the value, a replace missing its | — the value passes through untouched rather than the mapping failing.
Two exceptions are worth knowing. A character index that falls outside the value returns an empty string rather than the value, so the target parameter is blanked rather than left alone. And a transform only runs on text: a source that yields a number — the shipped apartment area mapping, for instance — is written straight through, and any transform on it is ignored however well formed it is. If a transform appears to do nothing, check the source type before you suspect the expression.
This is what makes the preview worth trusting: it runs the same code a real run does, so a malformed expression shows the sample coming back unchanged rather than an error. If the preview looks identical to what you typed in, the expression is not applying.
9.3Naming Patterns tab#
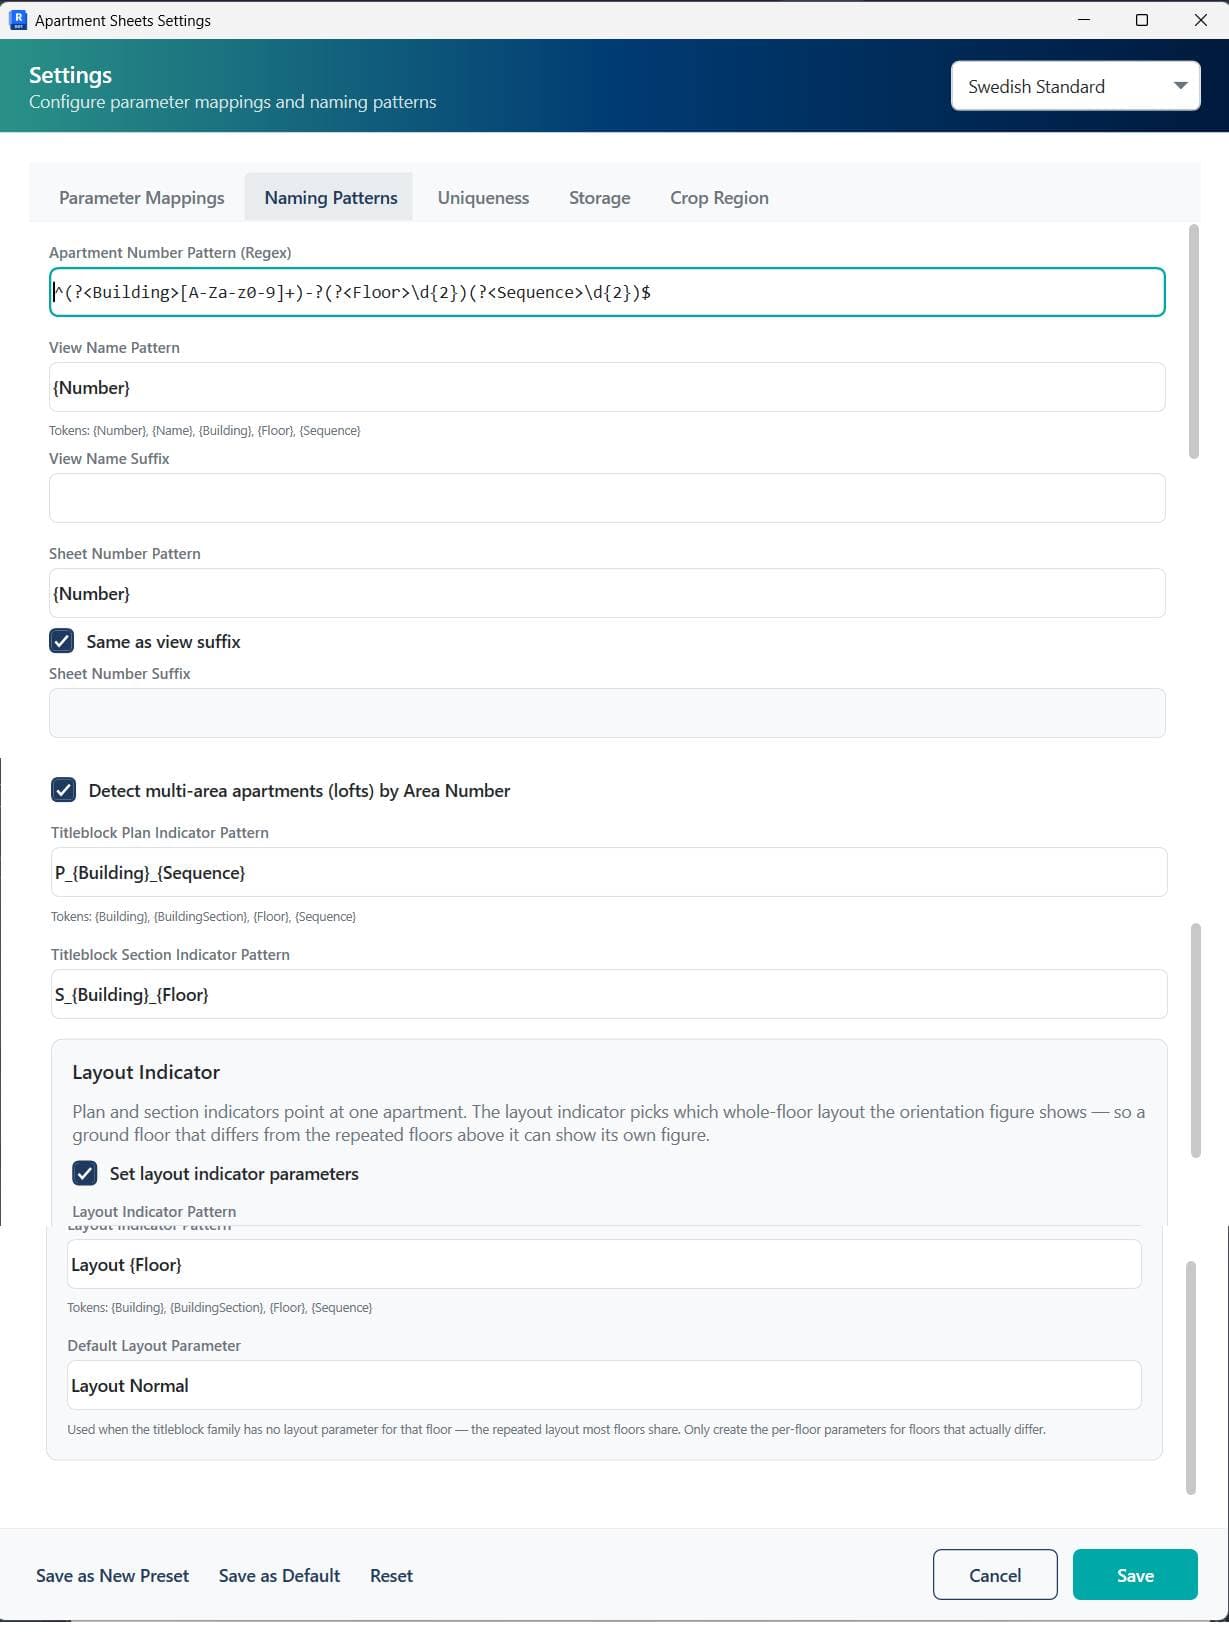
Patterns build names and numbers from the parts of an apartment number. Tokens are replaced with the apartment's own values.
| Setting | What it controls |
|---|---|
| Apartment Number Pattern | The regular expression that splits an apartment number into Building, Floor and Sequence. Uses named groups. |
| View Name Pattern | How view names are built. Tokens: {Number}, {Name}, {Building}, {Floor}, {Sequence}. |
| View Name Suffix | Default suffix for view names; can be overridden per run in the main window. |
| Sheet Number Pattern | How sheet numbers are built, from the same tokens. |
| Same as view suffix | Locks the sheet suffix to the view suffix. |
| Sheet Number Suffix | Default sheet suffix, used when the above is unticked. |
| Detect multi-area apartments (lofts) | Groups areas that share a Number onto one sheet. |
| Titleblock Plan Indicator Pattern | Names the plan key-figure visibility parameters. Tokens: {Building}, {BuildingModule}, {Floor}, {Sequence}. |
| Titleblock Section Indicator Pattern | Names the section key-figure visibility parameters, from the same tokens. |
| Set layout indicator parameters | Turns the layout indicator on or off. |
| Layout Indicator Pattern | Names the whole-floor layout visibility parameter, from the same tokens. |
| Default Layout Parameter | The layout used for floors the family defines no specific layout for. |
| Set building indicator parameters | Turns the building indicator on or off. |
| Building Indicator Pattern | Names the parameter that marks which building the sheet belongs to. Default Section {Building}. It has no fallback — if the family does not define the parameter, nothing is switched on. |
The number pattern#
The default pattern matches an optional dash between the building and the digits, two digits of floor and two of unit:
^(?<Building>[A-Za-z0-9]+)-?(?<Floor>\d{2})(?<Sequence>\d{2})$The three named groups — Building, Floor, Sequence — are what the tokens draw on, so a replacement pattern must keep those names.
The layout indicator#
The plan and section indicators point at one apartment. The layout indicator does something different: it picks which whole-floor layout the orientation figure shows.
Most projects have one layout that repeats up the building, plus a few floors that differ — a ground floor with an entrance, a top floor set back. So the tool tries the layout parameter for the apartment's own floor first, and if the title block family does not define one, it falls back to the default layout parameter.
With the shipped patterns and a family that defines Layout 10, Layout 11 and Layout Normal:
| Apartment | Floor code | Parameter switched on |
|---|---|---|
| A-1001 | 10 | Layout 10 — the family defines it |
| A-1103 | 11 | Layout 11 — the family defines it |
| A-1502 | 15 | Layout Normal — no Layout 15 in the family |
So you only create per-floor parameters for the floors that actually differ. A building where every floor is unique works the same way — define a parameter for every floor and the default is never reached.
The floor comes from the {Floor} token, the same parsed component the plan and section patterns use, so a floor code means the same thing in every parameter name the tool builds. Note that {Floor} is the code exactly as written in the apartment number: in Swedish numbering, which offsets floor codes by 10, the ground floor is 10. Name the family parameters after those codes and nothing has to be decoded.
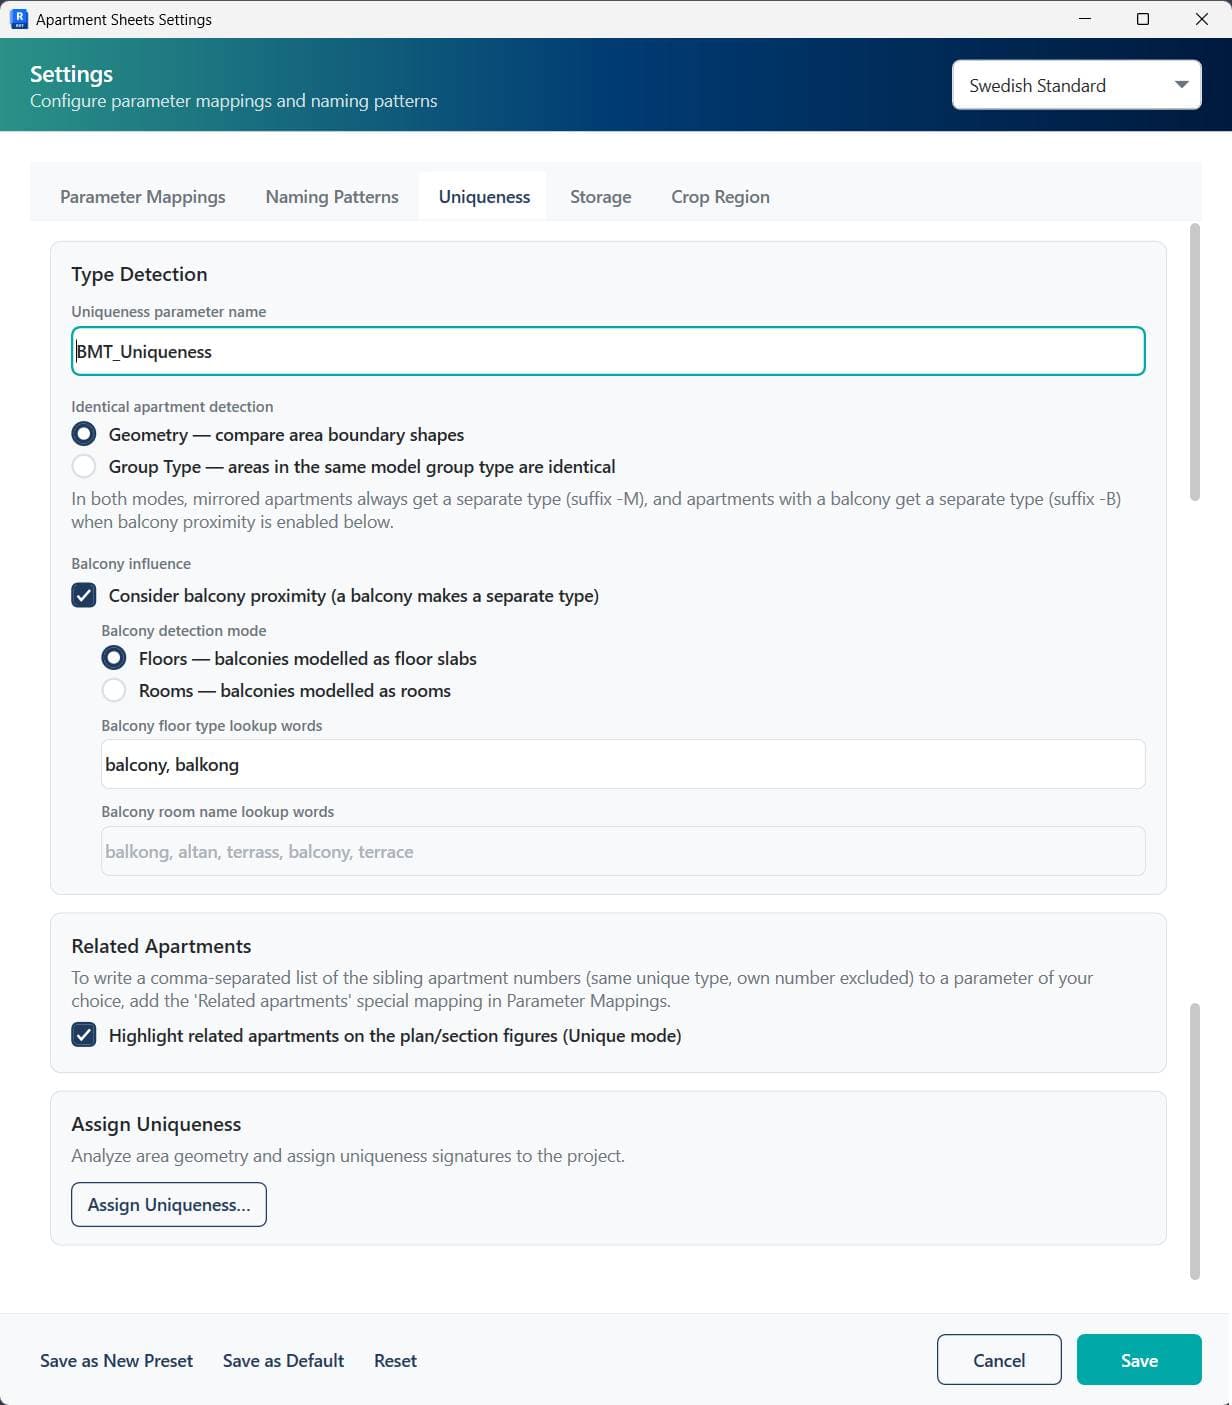
9.4Uniqueness tab#
Covered in full in chapter 8. In brief:
| Setting | What it controls |
|---|---|
| Uniqueness parameter name | The area parameter that stores each apartment's type signature. Default BMT_Uniqueness. |
| Identical apartment detection | Geometry or Group Type comparison. |
| Consider balcony proximity | Whether having a balcony makes a separate type. |
| Balcony detection mode | Whether balconies are floors or rooms. |
| Balcony floor type lookup words | The keywords matched against floor type names. Active when the detection mode is Floors. |
| Balcony room name lookup words | The keywords matched against room names. Active when the detection mode is Rooms. |
| Search distance (advanced) | How close to the area boundary a balcony has to sit to count as belonging to the apartment. The default suits a typical exterior wall; change it only after the lookup words and detection mode are right. Changing it means re-running Assign Uniqueness. |
| Highlight related apartments on figures | On unique runs, mark every apartment of the type on the key figures. |
| Assign Uniqueness… | Runs the analysis and writes the signatures. |
9.5Storage tab#
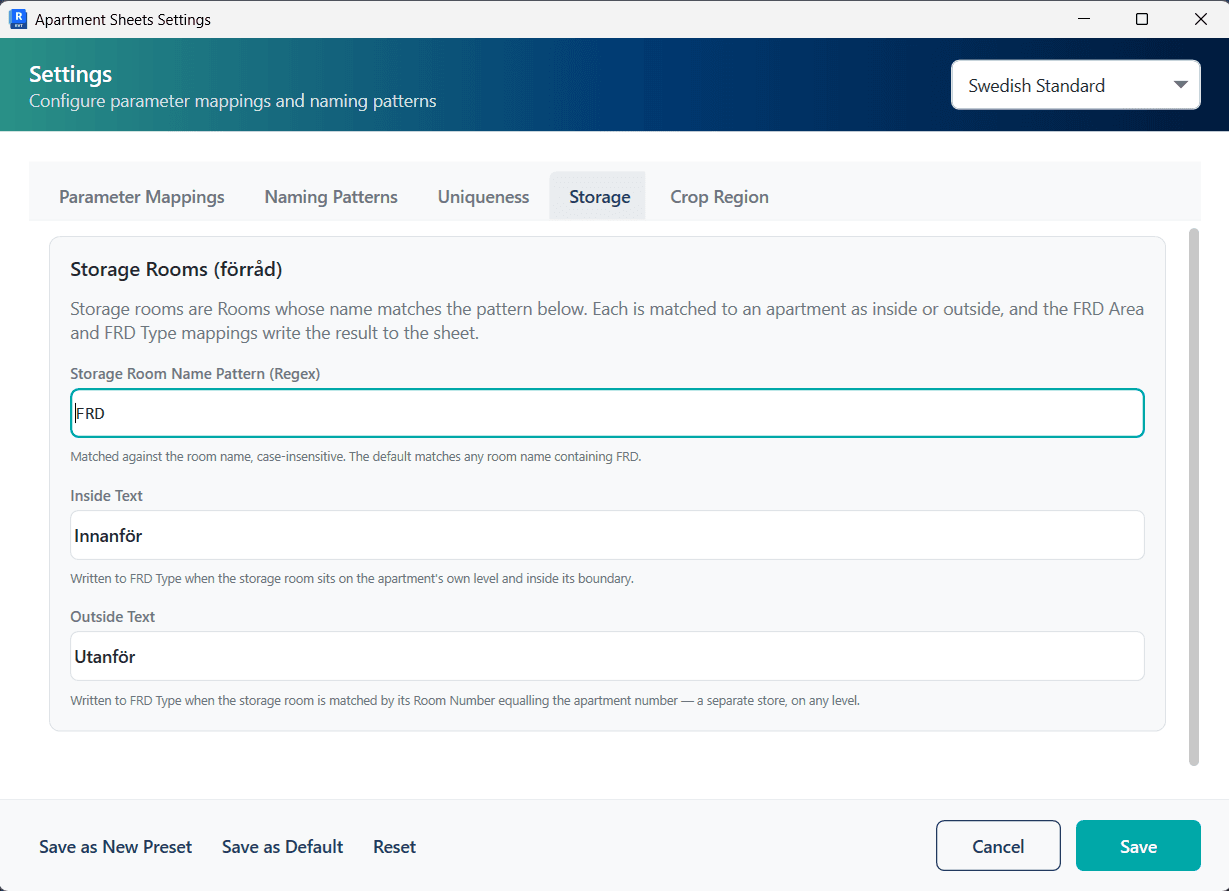
Storage rooms are Rooms whose name matches the pattern below. Each one is matched to an apartment as inside or outside, and the Storage Area and Storage Type mappings write the result to the sheet — into the parameters named FRD Area and FRD Type by default (section 11.1). The matching rules themselves are described in section 5.6.
| Setting | What it controls |
|---|---|
| Storage Room Name Pattern (Regex) | Which rooms count as storage. Matched case-insensitively against the room name. Default FRD. |
| Inside Text | Written by the Storage Type mapping when the storage room sits on the apartment's own level and inside its boundary. Default Innanför. |
| Outside Text | Written by the Storage Type mapping when the room is matched by its Number equalling the apartment number — a separate store, on any level. Default Utanför. |
When more than one storage room matches a single apartment, the preview reports it — "N förråd rooms matched apartment X — verify this is intended." That is usually either several stores genuinely belonging to one flat, which is fine, or a Room Number that has been reused, which is not.
9.6Crop Region tab#
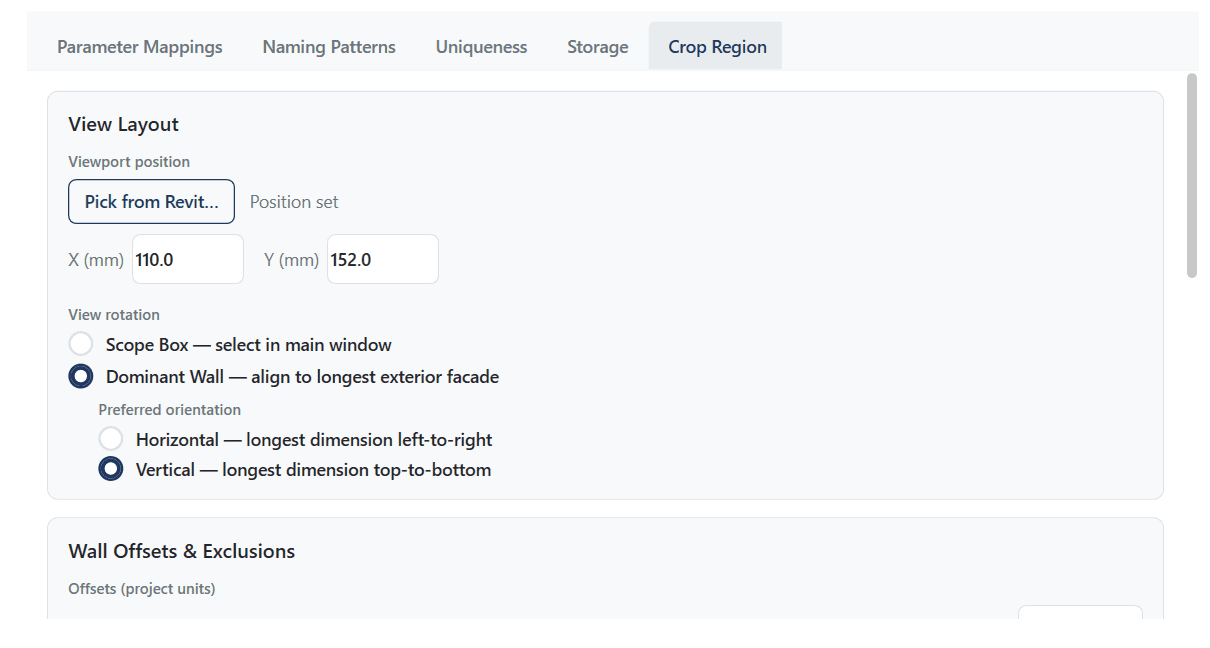
This tab controls where each view is cropped and how it sits on the sheet. It is the part worth tuning once per office template, because it decides how much manual tidying the output needs.
View layout#
- Viewport position — where the plan sits on the sheet. The reliable way to set it is Pick from Revit…: place one viewport by hand exactly where you want it, then pick it, and every sheet matches. The X and Y values can also be typed directly; they are shown in the project's length units, like every other length on this tab.
- View rotation — Scope Box or Dominant Wall, as described in section 6.5.
- Preferred orientation — with automatic rotation, whether the apartment's longest dimension runs left-to-right or top-to-bottom. Shown only when Dominant Wall is selected.
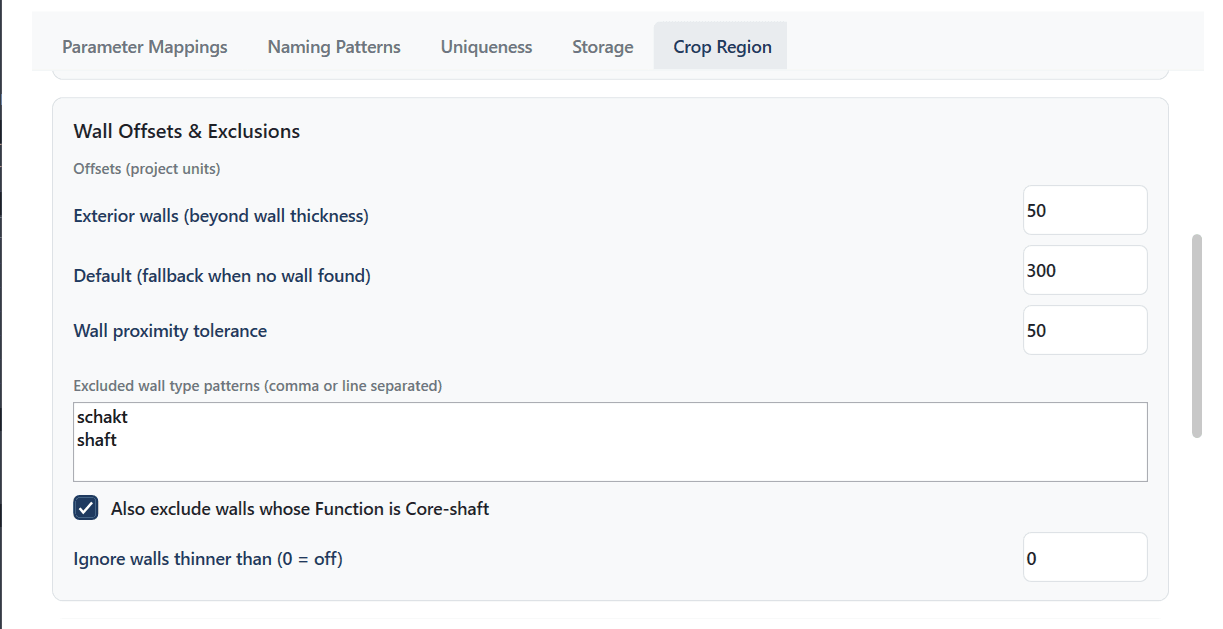
Wall offsets and exclusions#
| Setting | What it does |
|---|---|
| Exterior walls | Extra distance beyond the wall thickness for exterior walls, so the crop clears the outer face. Default 50. |
| Default (fallback) | Used when no wall is found at a boundary, or its thickness cannot be read. Default 300. |
| Wall proximity tolerance | How far from the area boundary a parallel wall can sit and still be treated as that boundary's wall. Default 50. |
| Excluded wall type patterns | Wall types the crop should ignore — shafts and similar. Matched as text anywhere in the type name. Default schakt. |
| Also exclude walls whose Function is Core-shaft | Catches shaft walls whose type name does not match the patterns above. |
| Ignore walls thinner than | Skips thin finish or schematic layers so the structural wall behind them controls the crop. Zero switches this off. |
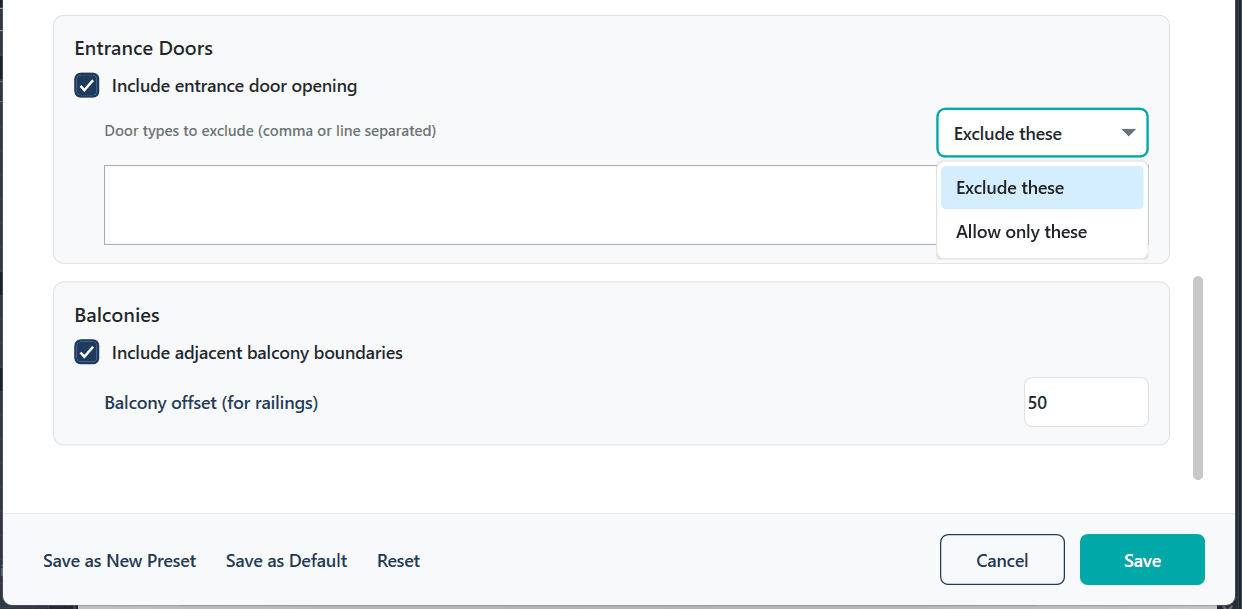
Entrance doors#
Include entrance door opening extends the crop across the entrance door so the doorway reads properly on the plan. Which doors count as entrances is controlled by a keyword list working in one of two modes:
- Exclude these — doors matching a keyword are never treated as entrances. Everything else is a candidate.
- Allow only these — only doors matching a keyword can be entrances.
Keywords are matched against door type and family names only, one per line or comma-separated. The list starts empty, which means every door is a candidate.
Balconies#
Include adjacent balcony boundaries extends the crop to take in a balcony belonging to the apartment, and Balcony offset adds a margin beyond the slab edge so railings are not clipped. Default 50.
10How the crop region is calculated#
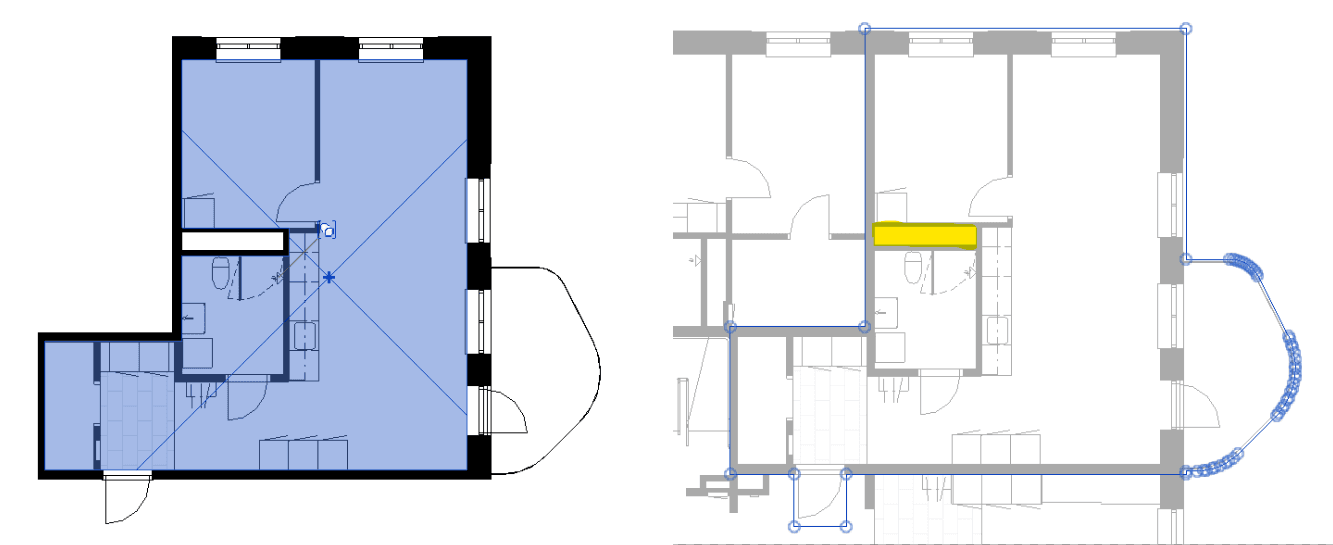
Understanding this makes the difference between fighting the settings and setting them once. It is also the first thing to check when a crop comes out wrong.
The tool works around the area boundary edge by edge, and splits each edge where the walls behind it change, so one long boundary can carry several different offsets. For each stretch it looks for the wall that belongs to it and offsets the crop outwards by an amount that depends on what it found:
| What was found at the boundary | Offset applied |
|---|---|
| An exterior wall | The distance out to the far face of the wall, plus the exterior wall offset — so the crop clears the outer face. |
| An interior wall | The wall thickness only — the crop stops at the far face. |
| An excluded wall (a shaft) | No offset at all. The tool bridges across a shaft to the next real wall rather than stopping at it. |
| No wall at all | The default fallback offset. |
The resulting edge offsets are combined into one boundary, together with the entrance door opening and any adjacent balcony, and that becomes the view's crop region. Exterior and interior walls are told apart by the wall's Function property in Revit, not by its name — so a wall with the wrong Function set will be offset the wrong way.
10.1When a crop comes out wrong#
- Crop cuts through a wall — check that wall's Function. An exterior wall set to Interior still crops to its far face, but loses the exterior offset beyond it.
- Crop stops at a shaft — add the shaft's wall type to the excluded patterns, The Core-shaft function option is already on by default, so a shaft whose Function is not set to Core-shaft needs the type pattern.
- Crop follows a thin finish layer instead of the wall behind it — set Ignore walls thinner than above that layer's thickness.
- Crop is much larger than expected on one edge — no wall was found there, so the default fallback was used. Check that the area boundary actually coincides with a wall.
- Balcony or doorway clipped — switch on the balcony or entrance door option, or increase its offset.
11Preparing the title block family#
The title block is what turns a cropped plan into a finished document. Two kinds of parameter matter: the shared parameters that receive mapped values, and the visibility parameters that drive the key figures.
11.1Shared parameters for mapped values#
Add a shared parameter for each value you want written. The defaults expect these, though the names are yours to choose as long as the mappings point at them:
| Value | Default target parameter |
|---|---|
| Apartment area | Apartment Area |
| Apartment type, from the area name | Sheet Description |
| Storage area | FRD Area |
| Storage location, inside or outside | FRD Type |
| Numbers of identical apartments | Set by you when you add the mapping |
11.2Key figures#
A key figure is a small diagram on the title block showing where in the building this apartment is. It works by having a filled region for every possible position, each controlled by its own visibility parameter; the tool switches on the one that corresponds to the apartment on the sheet. Building the parameters by hand is tedious, which is what the two helper commands are for.
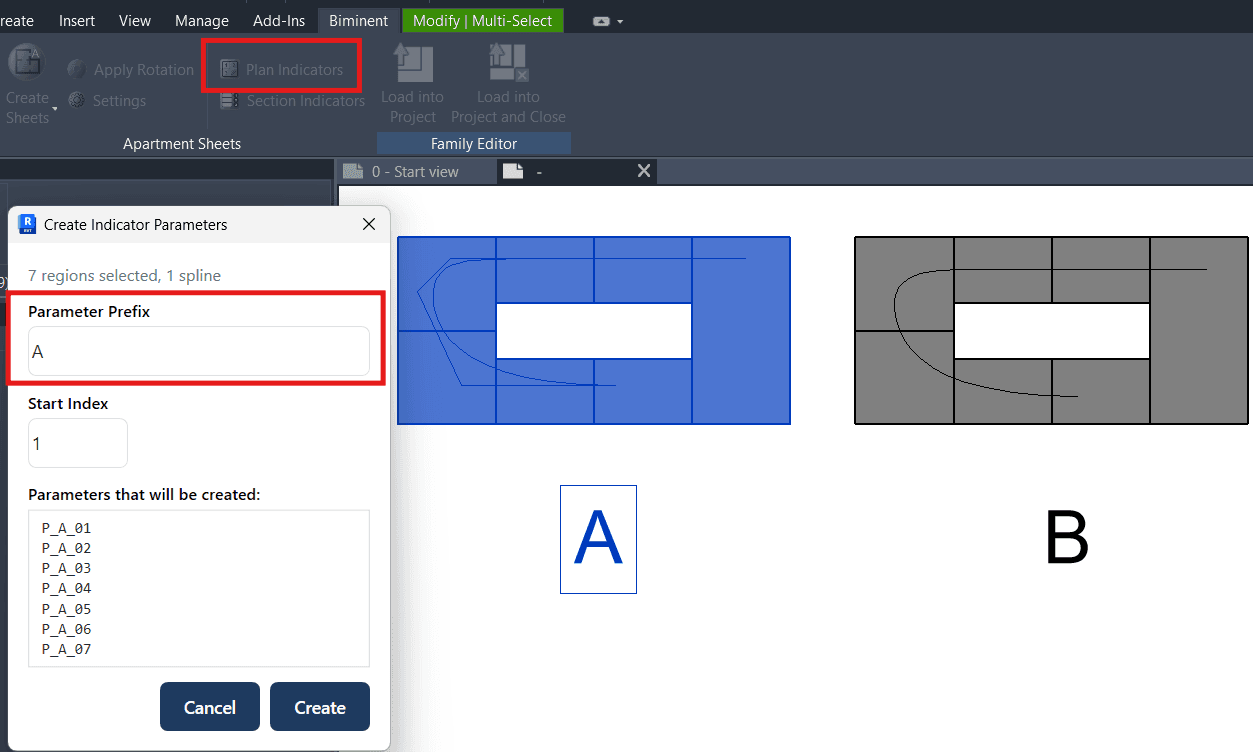
Plan indicators#
- Open the title block family in the Family Editor.
- Draw a filled region for each apartment position in the plan figure.
- Draw a spline through the regions in the order the positions should be numbered – The spline’s beginning is at the first apartment, its end is the last.
- Add a text note carrying the building identifier, for example "A". – This is optional. If you don’t have that text note, you can still add the building identifier at the next step in the tool dialog directly.
- Select the regions, the spline and the text note, and run Plan Indicators from the ribbon.
The command creates one visibility parameter per region, named from the plan indicator pattern, and sets them all to off by default so nothing shows until the tool switches a region on.
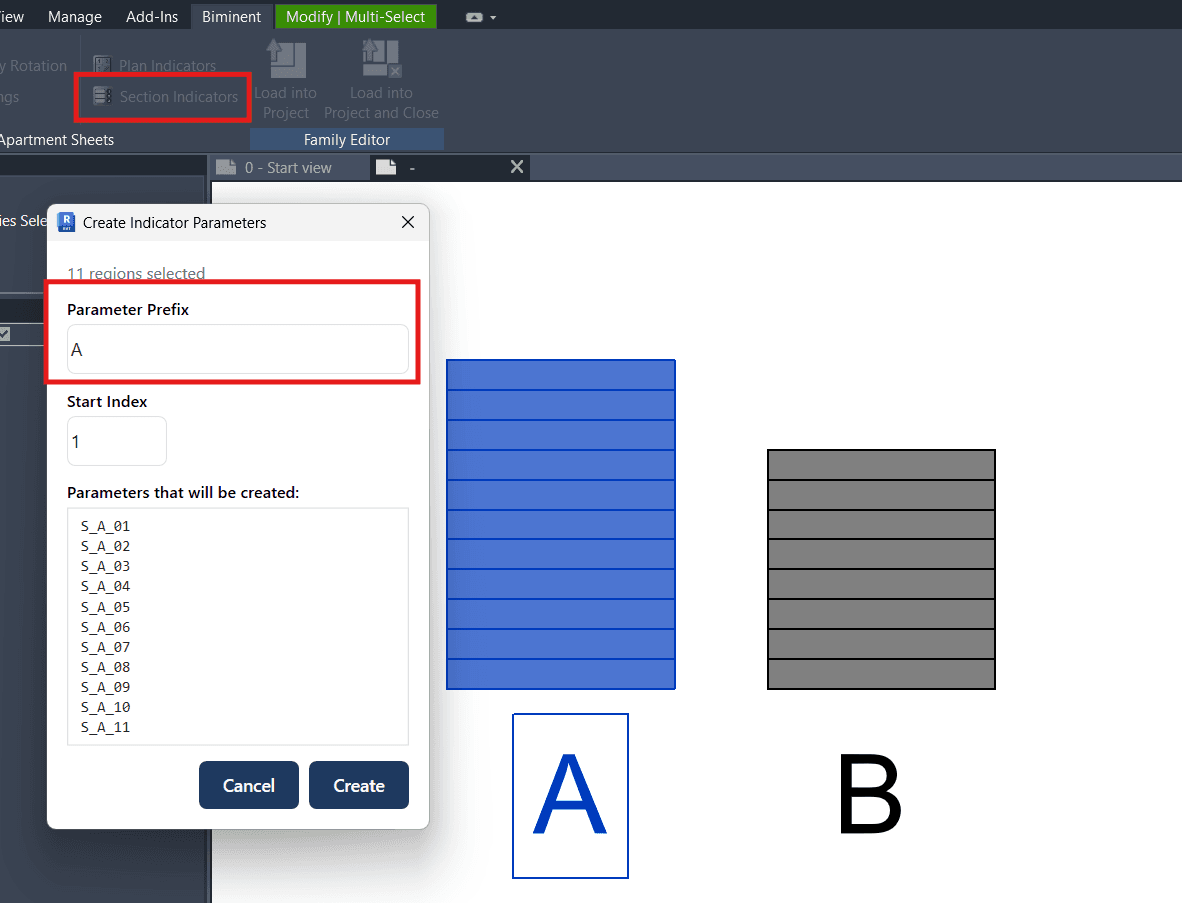
Section indicators#
- Draw a filled region for each floor in the section figure.
- Add a text note with the building identifier – This is optional. If you don’t have that text note, you can still add the building identifier at the next step in the tool dialog directly.
- Select them and run Section Indicators – The parameters are assigned from the bottom to the top corresponding to the levels.
11.3Indicator naming#
The tool finds the right parameter by building its name from the apartment number. The patterns are configurable. Each indicator has two of them: the tool tries the first, and uses the second only when the family does not define a parameter of that name.
| Indicator | Tried first | Then |
|---|---|---|
| Plan position | P_{Building}_{Floor}_{Sequence} | P_{Building}_{Sequence} |
| Section position | S_{BuildingModule}_{Floor}_{Sequence} | S_{Building}_{Floor} |
| Layout | Layout {Floor} | Layout Normal |
| Building section | Section {Building} | — |
Every pattern draws on the same parsed components, so a floor code means the same thing in all of them.
The plan, section, layout and building patterns are all editable on the Naming Patterns tab, along with the layout fallback. The plan and section fallback patterns are not exposed in the interface and keep the defaults above.
12Troubleshooting#
12.1Common situations#
| Symptom | Cause and remedy |
|---|---|
| The Biminent tab does not appear | Revit was open during installation — restart it. If it still does not appear, check that the add-in manifest is in the location for your Revit version (section 2.2) and that you are signed in. |
| Commands are greyed out | The sheet commands need a project document open; Plan Indicators and Section Indicators only work in the Family Editor. |
| The apartment list is empty | No Areas in the model, or apartments modelled as rooms rather than areas — the tool reads Areas only. Areas without a Number, and areas that are unplaced or have no area, are skipped and never appear in the list. |
| View names or sheet numbers look wrong | The apartment number did not match the parsing pattern, so the building, floor and unit tokens were left in the name as literal text. Check the pattern against your numbering (section 9.3). |
| A sheet or view comes out named _Copy | The name was already in use, so the tool appended _Copy until it was free rather than stopping. Use Preview and edit the name in the grid before running, or set a suffix that separates this batch from the existing sheets. |
| Crop regions are wrong | See section 10.1 — it lists the specific causes and what to change for each. |
| Key figures are blank | The visibility parameter the tool looked for does not exist in the title block family under that name. See section 11.3. |
| Storage values are empty | Storage rooms are not matching the pattern on the Storage tab, or a storage room outside an apartment does not carry that apartment's Number. |
| Related apartments are not written | That data is only written on unique runs. Reach your selection through the Unique button, not by ticking rows (section 6.1). |
| Too many apartments are reported as unique | Geometry comparison is splitting apartments that differ only by modelling tolerance. Switch to Group Type comparison if apartments are grouped (section 8.1). |
| A sign-in card keeps appearing | The licence could not be refreshed. Sign in from the account window to clear it (section 3.3). |
12.2Log files#
The tool writes a detailed log of every run, and it is the fastest route to a diagnosis for anything geometric. One file per day:
Only the seven most recent daily logs are kept; older ones are deleted each time the tool starts. Copy the file out if you need to keep it for longer than that.
%AppData%\Biminent\ApartmentSheets\logs\apartmentsheets_YYYY-MM-DD.logThe log records how each wall was classified, what offset each boundary edge received, which balconies and doors were detected, and every parameter the tool wrote. When reporting a problem, attach the log for the day it happened.
12.3Getting support#
Write to support@biminent.com with the Revit version, the plugin version, the log file, and a short description of what you expected. A screenshot of the model condition helps for anything about crop regions.
Appendix AToken reference#
Tokens available in the naming and indicator patterns. All are derived from the apartment number by the parsing pattern, except {Name}, which comes from the area.
| Token | Meaning | Example from A-1301 | Works in |
|---|---|---|---|
| {Number} | The full apartment number | A-1301 | View & sheet patterns |
| {Name} | The area name | A Standard | View & sheet patterns |
| {Building} | Building identifier | A | All patterns |
| {BuildingModule} | The module within the building, split off a letters-then-digits identifier — A1 is module 1 of building A. Empty when there is no module. | (empty) | Indicator patterns |
| {Floor} | Floor code as written in the number | 13 | All patterns |
| {Sequence} | Unit number within the floor | 01 | All patterns |
Appendix BDefault values#
The values the tool ships with. The lengths in the table are in millimetres, however the unit seen in level is the default length unit set in your Revit project.
| Setting | Default |
|---|---|
| Exterior wall offset | 50 |
| Default fallback offset | 300 |
| Wall proximity tolerance | 50 |
| Balcony offset | 50 |
| Ignore walls thinner than | 0 (off) |
| Excluded wall type patterns | schakt |
| Exclude Core-shaft function walls | On |
| Include entrance door opening | On |
| Entrance door keyword list | Empty — every door is a candidate |
| Include adjacent balcony boundaries | On |
| View rotation method | Dominant Wall |
| Preferred orientation | Vertical |
| Uniqueness parameter | BMT_Uniqueness |
| Identical apartment detection | Geometry |
| Consider balcony proximity | On |
| Balcony detection mode | Floors |
| Balcony floor type keywords | balcony, balkong |
| Balcony room name keywords | balkong, altan, terrass, balcony, terrace |
| View name pattern | {Number} |
| Sheet number pattern | {Number} |
| Same as view suffix | On |
| Detect multi-area apartments | On |
| Layout indicator pattern | Layout {Floor} |
| Default layout parameter | Layout Normal |
| Storage room name pattern | FRD |
| Storage inside / outside text | Innanför / Utanför |
| Building indicator pattern | Section {Building} |
| Balcony search distance | 1006 (3.3 ft internal) |
Still need help? Contact us, or download this manual as a PDF.